OWA: Adding Two-Factor Authentication to Outlook Web App
This guide covers installing and configuring the Protectimus OWA component to add two-factor authentication (2FA) to Outlook Web App and Exchange Admin Center (EAC), using either the Protectimus Cloud MFA service or the Protectimus On-Premise MFA Platform.
ATTENTION! .NET Framework 4.7.x is required.
Prerequisites
- .NET Framework 4.7.x installed on the Exchange server.
- Administrator access to the Exchange server where the component will be installed
- A trusted SSL certificate on the network if integrating with the On-Premise Platform — an auto-generated certificate created during Platform installation is not accepted by Exchange Server. A certificate issued via AD CS through certsrv is recommended.
- User logins in the Protectimus system formatted as user@domain or DOMAIN\user (see Step 5 for details).
Supported Exchange Versions
The Protectimus OWA component supports Exchange Server 2013, 2016, and 2019 through Outlook Web App. For Exchange Server 2010, use Protectimus DSPA instead, which integrates directly with Active Directory rather than the OWA/EAC login flow.
Required Components
- Protectimus Cloud MFA account, or an installed Protectimus On-Premise MFA Platform.
- A Resource created in the Protectimus system.
- Users and Tokens, either added manually or provisioned through the Users’ Self-Service Portal.
- The Protectimus OWA installer, downloaded from the OWA solution page.
1. Get Registered and Configure Basic Settings
PLEASE NOTE! An SSL certificate trusted on your network must be used to integrate OWA with the On-Premise Platform. An auto-generated certificate created during installation cannot be accepted by the Exchange Server. We recommend using a certificate issued by AD CS via certsrv.
ATTENTION! Users in the Protectimus system must have logins in the format user@domain or DOMAIN\user. For more details on the user login format, refer to section 5. Username Format Configuration.
Choose your deployment option and complete the basic setup:
Protectimus Cloud Service
- Register with the Protectimus Cloud Service and activate API.
- Add a Resource.
- Add Users. NOTE! Users in Protectimus system must have logins of the form user@domain or DOMAIN\user.
- Add Tokens manually or activate the Users’ Self-Service Portal.
- Assign Tokens to Users.
- Assign Users and Tokens to the Resource.
Protectimus On-Premise Platform
- Install the Protectimus On-Premise Platform.
- Add a Resource.
- Add Users. NOTE! Users in Protectimus system must have logins of the form user@domain or DOMAIN\user.
- Add Tokens manually or activate the Users’ Self Service Portal.
- Assign Tokens to Users.
- Assign Tokens with Users to the Resource.
2. Install the Protectimus OWA 2FA Сomponent
- Download the Protectimus OWA 2FA installer.
- Run the installer as administrator.

- You will see a welcome screen, click Next to continue.

- Read and accept the terms in the license agreement and click Next to continue the installation.

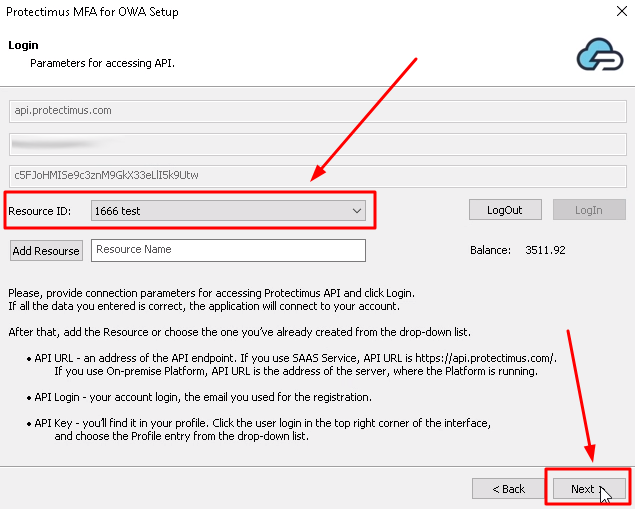
- Enter API URL, Login, and API Key and click LogIn.These parameters stand for:
- API URL – an address of the API endpoint. If you use SAAS Service API URL is https://api.protectimus.com/. In the case of the on-premise Platform, API URL is a server address, where the Platform is running (for example, https://localhost:8443).
- Login – the login of your account, the same as for signing in.
- API Key – you’ll find it in your profile. To access a profile, click the user’s login in the top right corner of the interface, and choose the “Profile” entry from the drop-down list.

- Resource ID. Choose the Resource you’ve created before the installation. After that click Next to continue.
If you haven’t added the resource yet, add it now. Click Add Resource and enter any Resource Name you wish.
- Set additional settings:
- Invalid OTP Message – specify the message text for invalid OTP.
- General API Error Message – specify the API error message text.
- AD Group – if you want to add two-factor authentication only for a specific AD group, select that AD group. By default, two-factor authentication will be enabled for all users.
- Protocol – specify information about the connection protocol. SSL3, TLS1, TLS1.2, and TLS1.3 are supported.
- Cache Timeout – specify how often Protectimus will contact Active Directory to check if the user requesting OWA access is added to AD. Time must be indicated in minutes. By default, the value is set to 15 minutes, which means that Protectimus will synchronize with Active Directory once every 15 minutes. If you specify a value of 0, the system will contact Active Directory every time a user logs in.
- OTP Cookie Lifetime – specify how often the end users will be asked to re-authenticate. Time must be indicated in minutes. By default, the value is set to 720 minutes (12 hours), which means that every 12 hours your users will be asked to enter their one-time passwords to continue working with OWA.
PLEASE NOTE! You can also change these settings in the configuration file later.

- Click Next to continue.

- Everything is ready for installation. Check the boxes for the modules you want to protect – OWA, Exchange Admin Center, or both of them. Then click Install.

3. Log in to Outlook Web App or EAC with Protectimus 2FA
- Open your Outlook Web App or Exchange Admin Center.
- Enter your Username and Passcode, and then click Login.
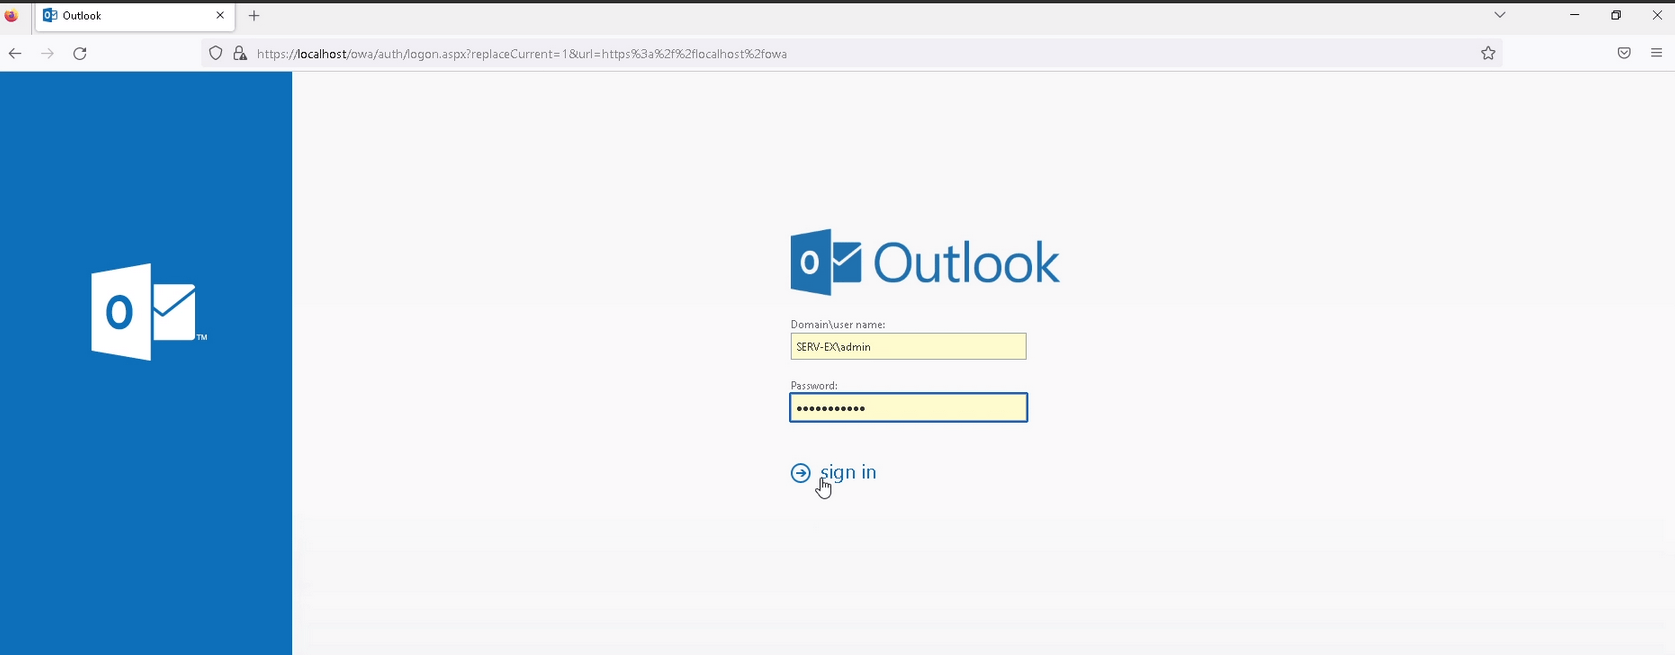
- Enter the one-time password from the two-factor authentication token.

PLEASE NOTE! If you use an OCRA token, use the challenge you will see on the authentication page to generate a one-time password.

4. How to Change Settings
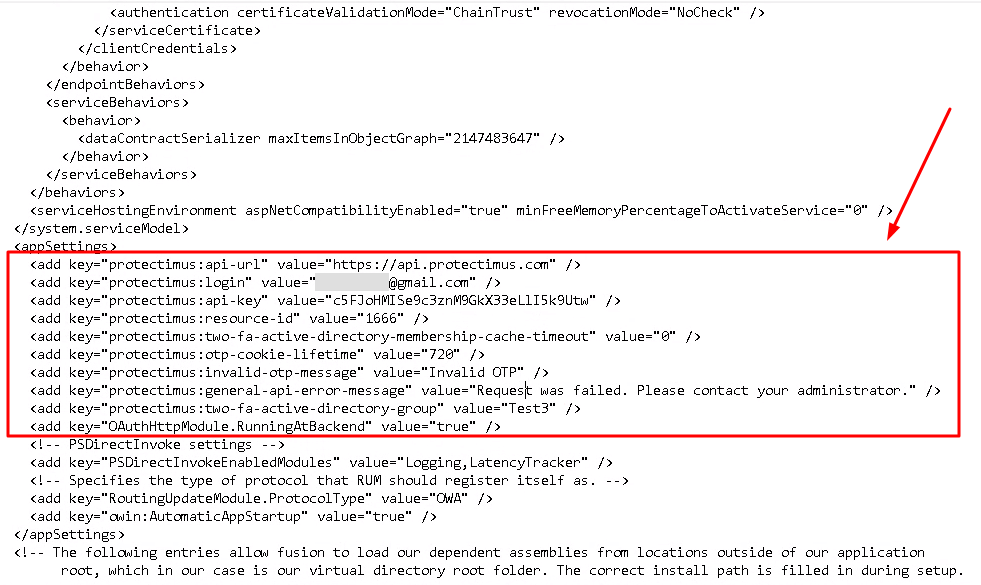
You can change any settings, including API URL, API key, Resource ID, Group settings and other optional settings, in the config file.
The configuration file is usually located at the following path:
C:\Program Files\Microsoft\Exchange Server\V15\ClientAccess\Owa
5. Username Format Configuration
The user login in the Protectimus service should be in the format of user@domain or DOMAIN\user, where user is the username in AD, and domain is your corporate domain.
To transmit the user login in the desired format to the API, you can use the following parameter in the configuration file:
<add key="protectimus:is-owa-old-format" value="true" />
The
protectimus:is-owa-old-format parameter can have two values:
true or
false.
| PARAMETER VALUE |
FUNCTION |
true
|
When the user enters the login in the format DOMAIN\user (netBiosName), the login is converted to the user@domain format (UserPrincipalName). |
false
|
When the user enters the login in the format user@domain, the login is converted to the DOMAIN\user format. |
If the parameter is not set
|
The user’s login, entered during login, is transmitted to the API in its original format. |
Additionally, the user can enter the login in the format user@domain if the value is set to true, or DOMAIN\user if the value is set to false. In this case, no conversion will be performed as the login is already in the “correct” format.
Troubleshooting Notes
- Installer fails or won’t proceed — confirm .NET Framework 4.7.x is installed on the Exchange server before running the installer.
- On-Premise Platform integration fails to connect over SSL — confirm the certificate is trusted on the network. An auto-generated certificate from Platform installation is not accepted by Exchange Server; use a certificate issued via AD CS / certsrv.
- Users can’t log in with the expected username format — check the
protectimus:is-owa-old-format parameter against the format your users actually enter (see Section 5, Username Format Configuration).
- AD group–scoped users aren’t being prompted for 2FA, or vice versa — check the Cache Timeout value. Set Cache Timeout to 0 to make Protectimus contact Active Directory on every login while troubleshooting.
FAQ
How do I install Protectimus OWA MFA?
Download the installer from the OWA solution page, run it as administrator on the Exchange server where the component will be installed, enter your API URL/Login/API Key, select a Resource, configure AD group and session settings, then select OWA, EAC, or both and install.
What are the prerequisites for Protectimus OWA?
.NET Framework 4.7.x on the Exchange server, administrator access for installation, and — for On-Premise Platform integration — a trusted SSL certificate rather than an auto-generated one.
How do I configure OTP Cookie Lifetime?
Set it during installation, or change it afterward in the configuration file located at
C:\Program Files\Microsoft\Exchange Server\V15\ClientAccess\Owa It controls, in minutes, how often users must re-enter a one-time password (default: 720 minutes).
How do I enable MFA for OWA and EAC together?
During installation, check both the OWA and Exchange Admin Center modules on the final installation screen before clicking Install.
What username format does Protectimus OWA require?
user@domain or
DOMAIN\user
Login conversion between these two formats before it is sent to the API is controlled by the configuration parameter
protectimus:is-owa-old-format
Where is the OWA configuration file?
By default, at
C:\Program Files\Microsoft\Exchange Server\V15\ClientAccess\Owa
Related Documentation
If you have other questions, contact Protectimus customer support service.