Setting Up and Using the User Self-Service Portal
The Protectimus User’s Self-Service Portal lets users handle various tasks independently, such as enrolling and managing their security tokens and personal information. The system administrator decides which tasks users can do.
Please note:
- The Self-Service Portal must be enabled and configured separately for each resource.
- Users must be assigned to an appropriate Resource in order to have access to the Self-Service Portal.
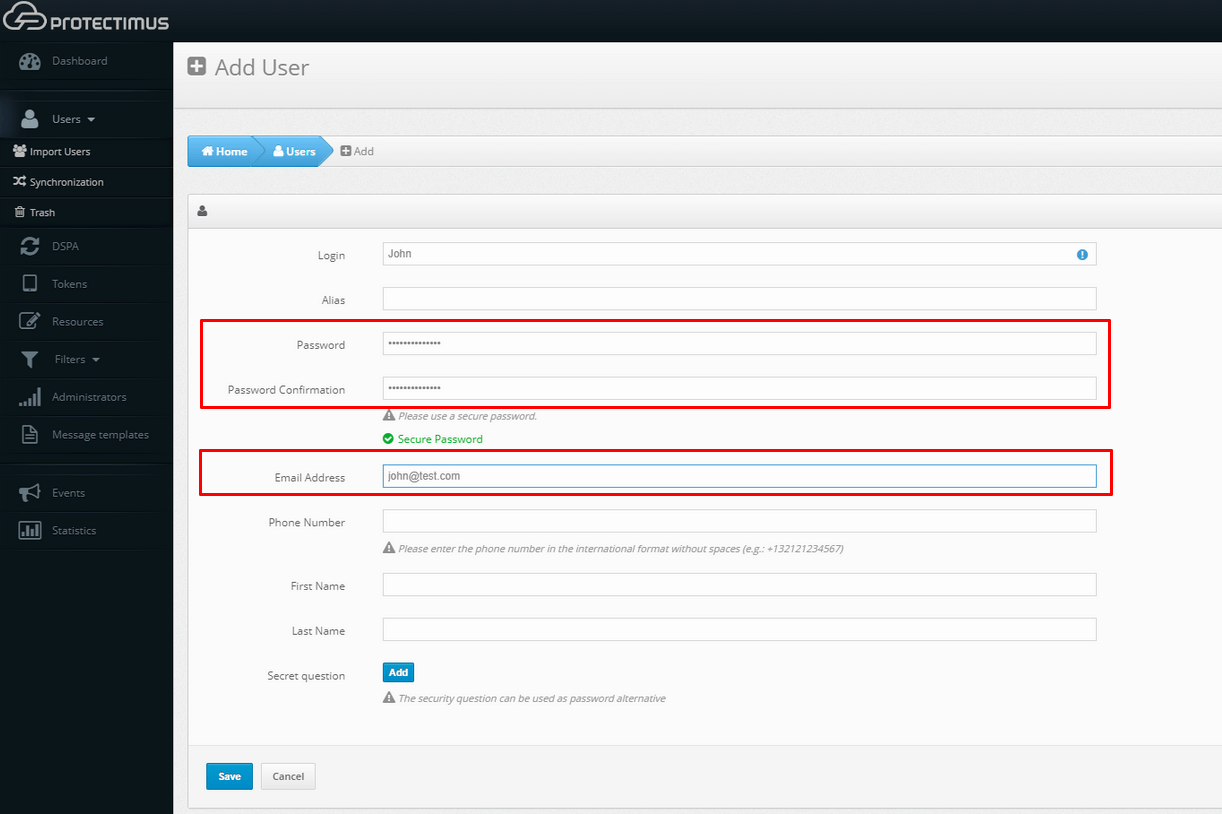
- You must also add a password or an email address to the User when creating a user in the Protectimus system. A verification code will be sent to the registered email address to allow users to log into the Self-Service Portal. If a user has both a password and a registered email address, that user will use the password to log in.
- After a token is issued for a user and assigned to a Resource, the user will also be asked to input a password from the token when logging in.
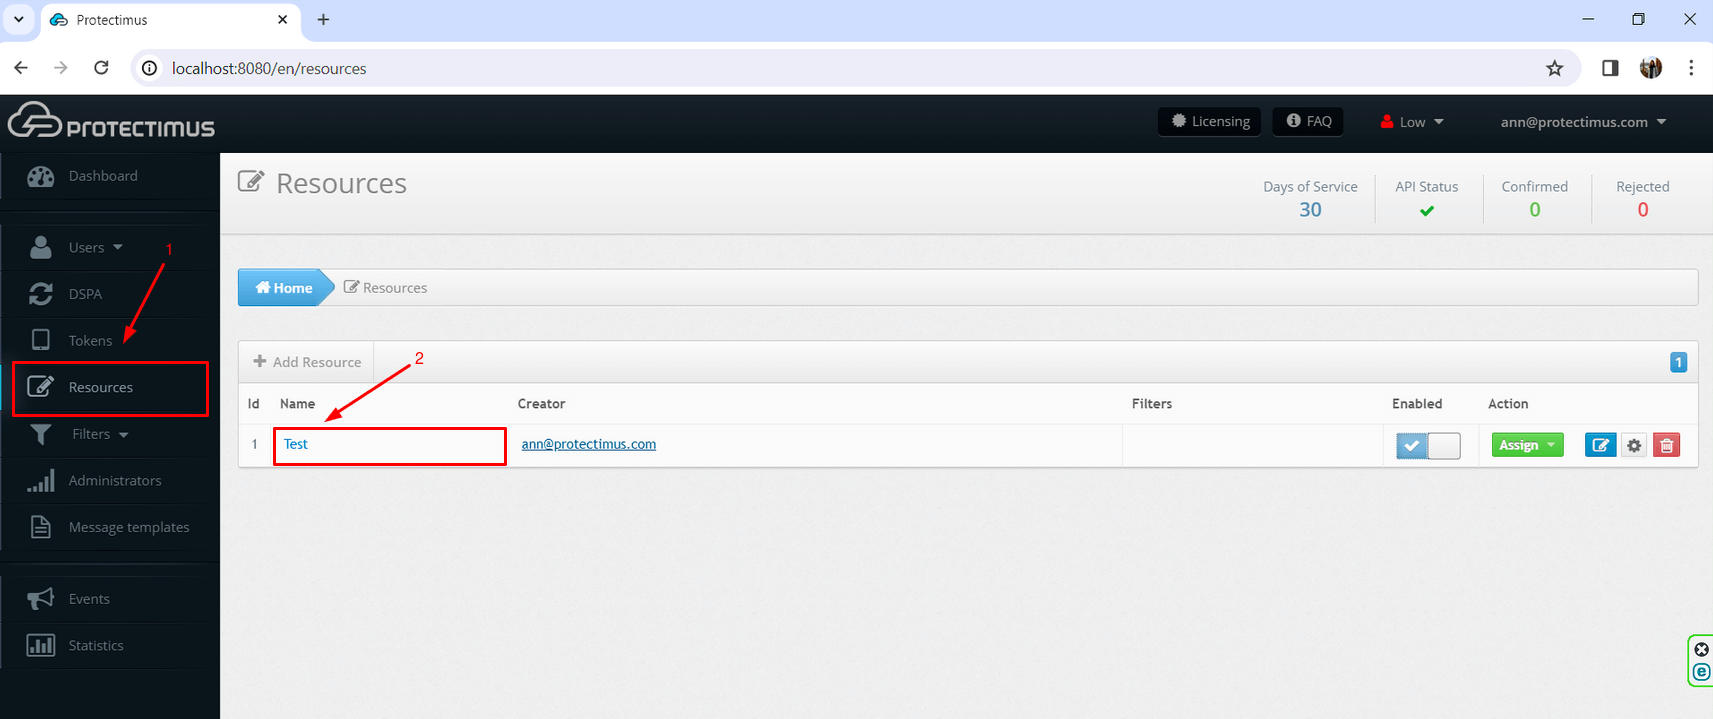
1. Activate the Protectimus User’s Self-Service Portal
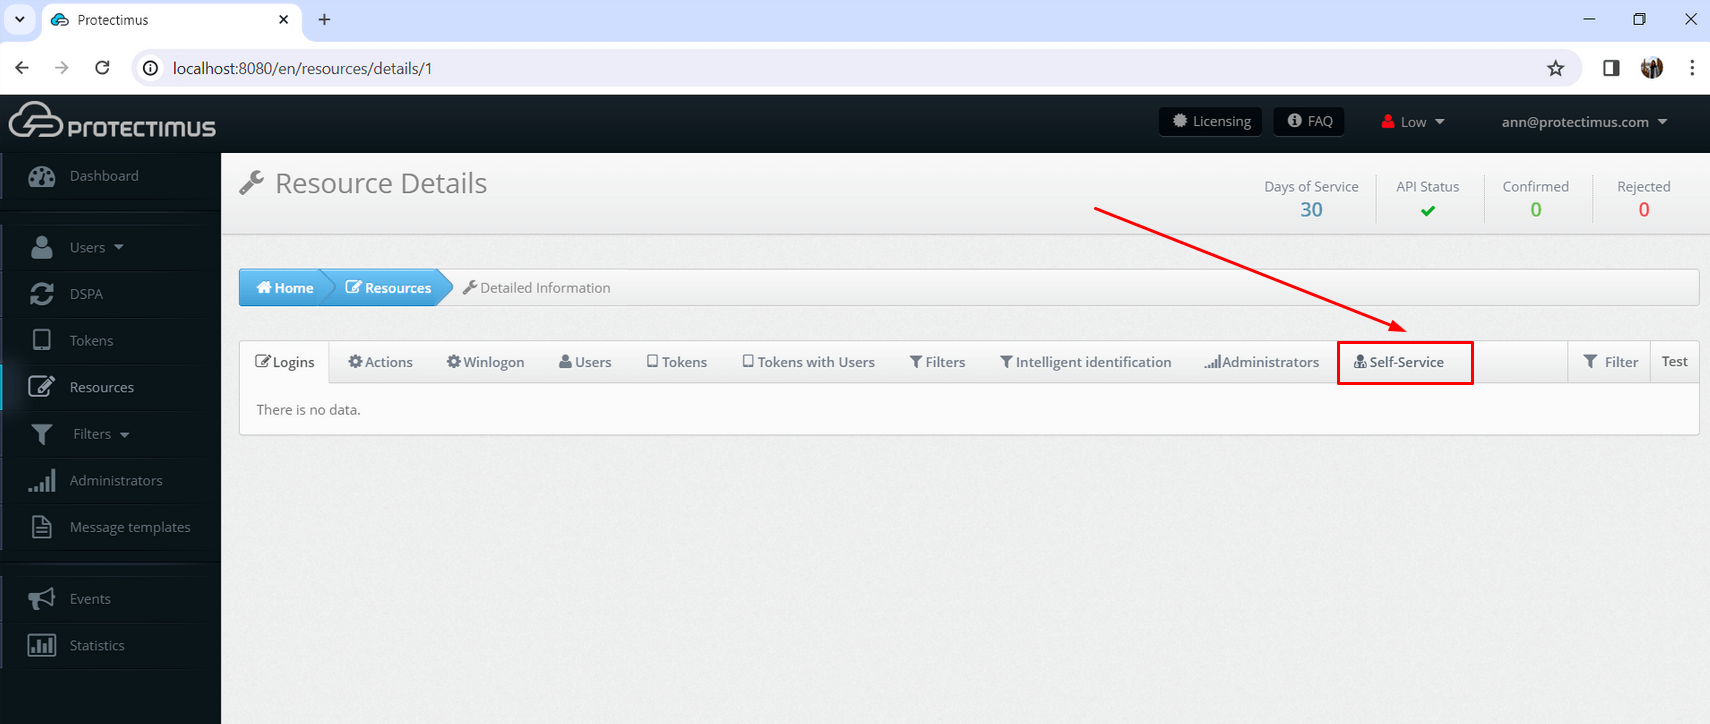
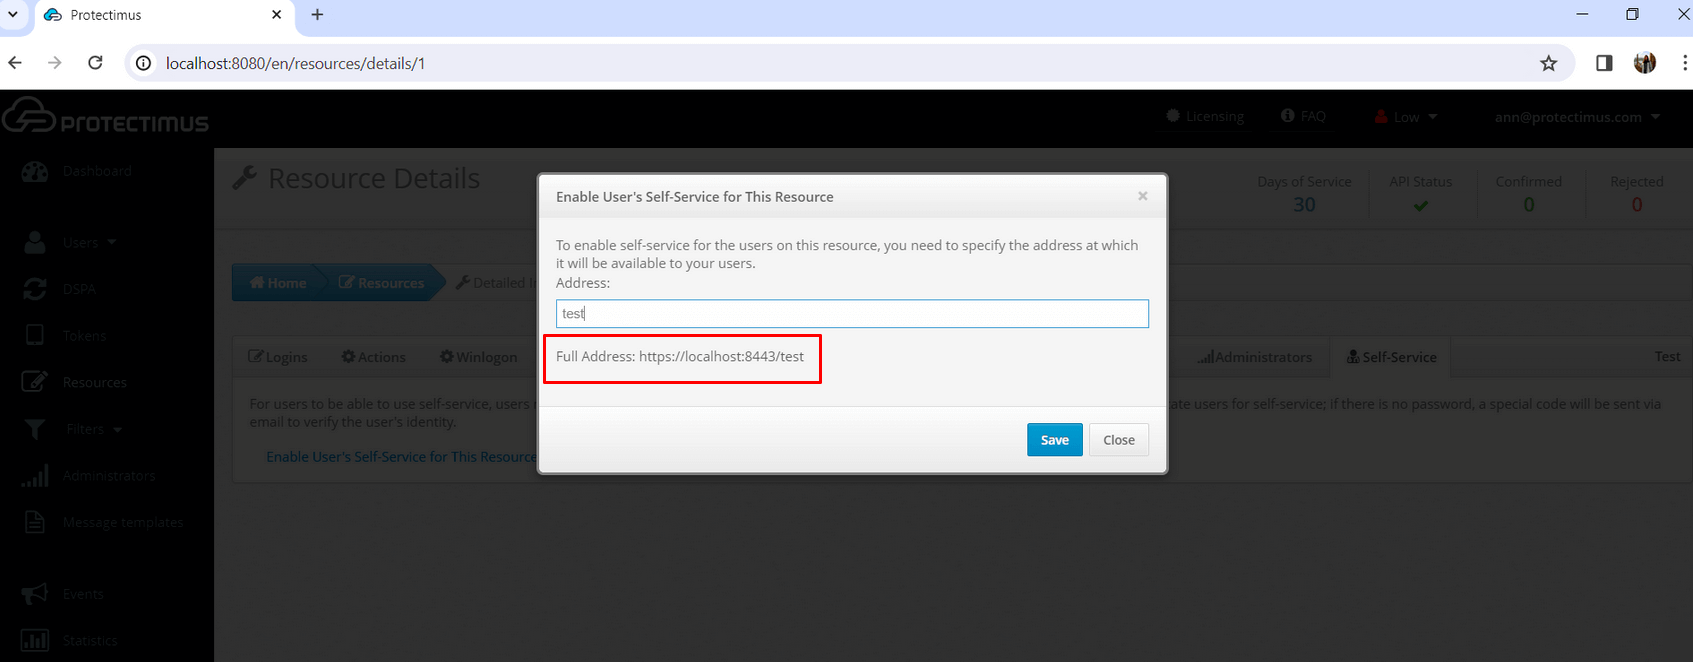
- Log into your account in Protectimus SAAS Service or On-Premise Platform. Then, go to the Resources tab, click on the resource name, and navigate to the Self-Service tab.
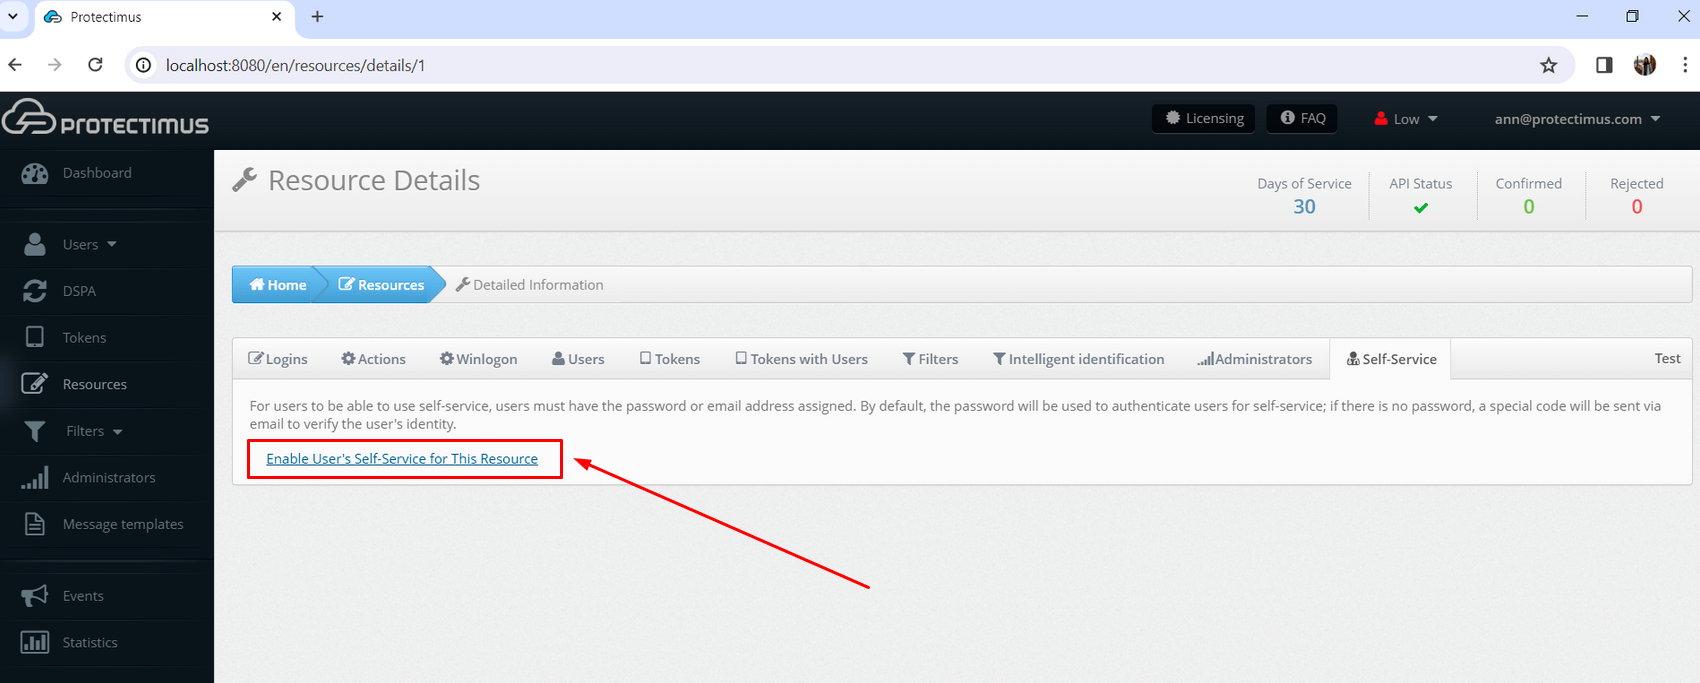
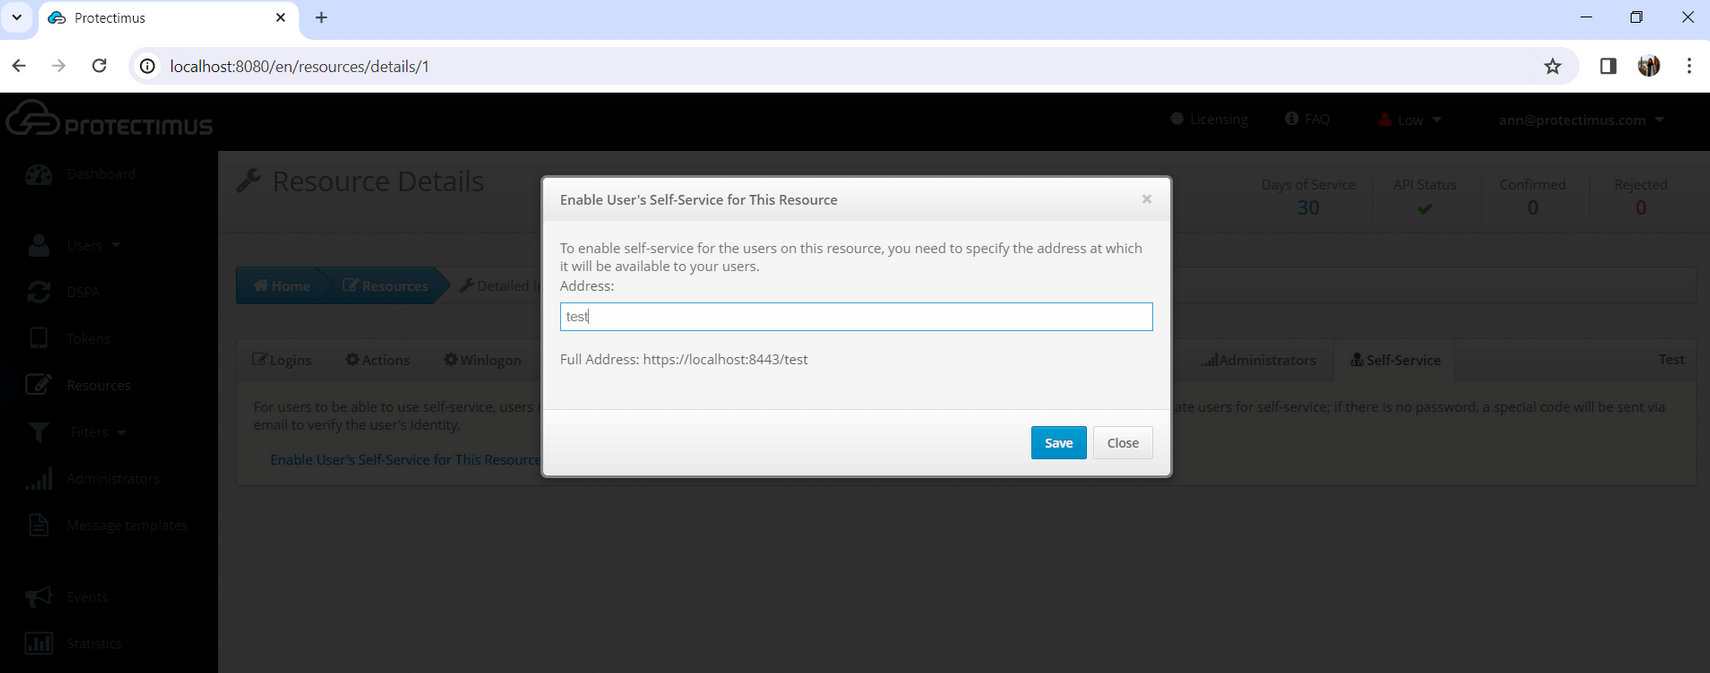
- If you haven’t enabled the Self-Service Portal for your users yet, click on Enable User’s Self-Service for your resource, and specify the address at which your users will access the Self-Service Portal.
2. Set Up the Protectimus User’s Self-Service Portal
Now, choose the authentication methods your users will use to log into the Self-Service Portal and specify the actions that will be available to them.
2.1. If you use the Protectimus Cloud Service
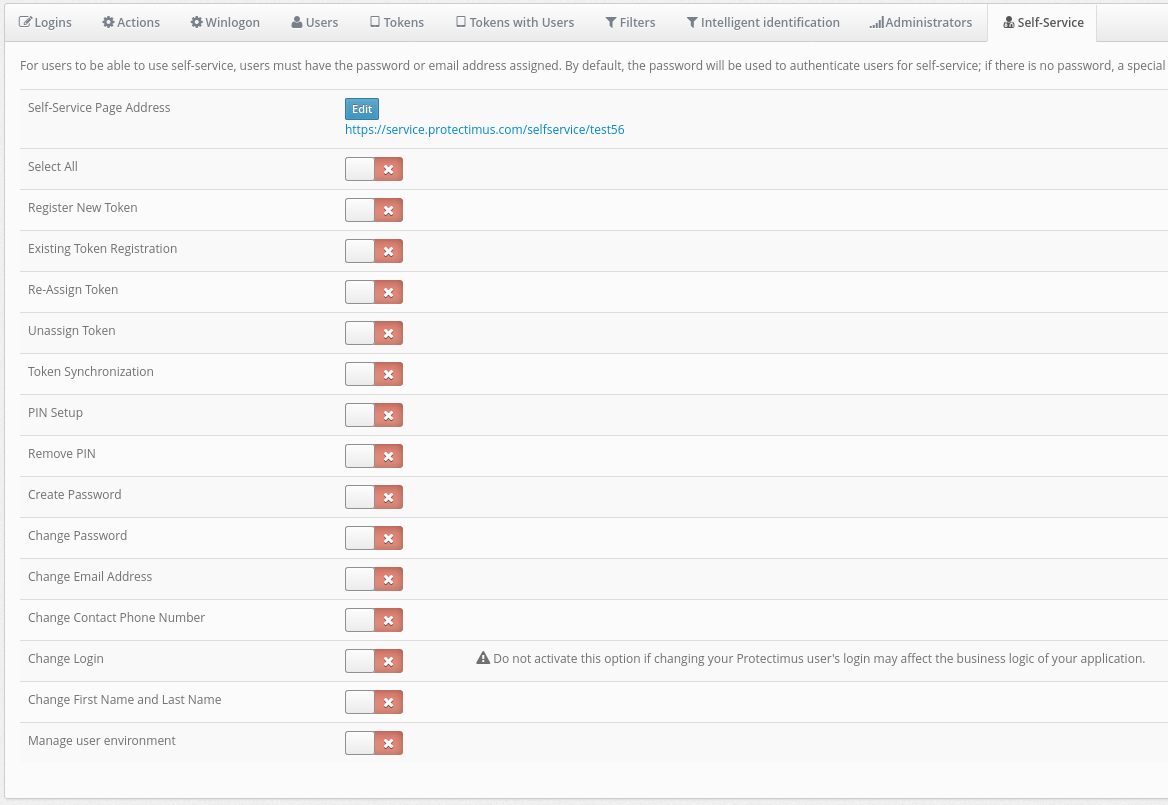
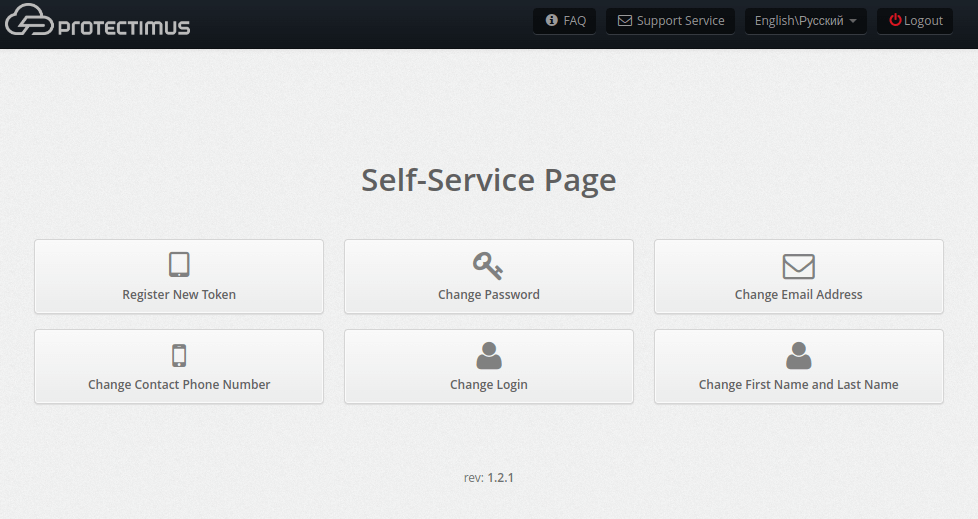
Once you click on the
Save button, you will see a list of actions that your users can perform, as depicted in the image below. Initially, all actions are turned off by default. Activate the actions you’d like your users to have access to:
- Register New Token. This feature lets users create, issue, and assign themselves tokens. When you activate this option, users will see a list of token types they can access through the portal. You can choose to enable only the types of tokens you intend to use, preventing users from being overwhelmed by too many options. Once a user creates a token, it will be linked to this resource as a “token with user.” Afterward, the user will need to input a one-time password from the token every time they log into the portal.
- Existing Token Registration. Allows users to confirm that they have received a token. Helpful when using physical tokens. After receiving a set of tokens, assign them to a resource and distribute them to your users as you wish. When users receive their tokens, they can input their serial numbers on their own and confirm the tokens are in their possession with one-time passwords.
- Re-Assign Token. Allows users to exchange an existing token for a new one. After performing this action, the old token will be unavailable.
- Unassign Token. Allows users to unlink a token with a user from a resource. The user will remain associated with the token. In effect, the resource assignment is changed from “token with user” to just “user.”
- Token Synchronization. Allows users to synchronize tokens if the time or counter on the device has become desynchronized from the server (more relevant for hardware tokens using TOTP and OCRA algorithms). Used primarily with physical tokens. Protectimus Smart has a built-in synchronization feature. It’s important to note that Protectimus Smart synchronizes itself with the time on Protectimus servers. If you have your own platform, be sure to set the time on it correctly.
- PIN Setup. Allows users to add a PIN to a token. When this feature is enabled, users are required to enter a four-digit code either before or after the OTP itself, depending on their settings. For example, if a user chooses “1111” as a PIN and chooses to enter the PIN after the OTP, and the user’s token generates “123456” as a one-time password, the user must input the following combination into the OTP entry field: “1234561111”.
- Remove PIN. Allows users to turn off the PIN feature.
- Create Password. Allows users to create a Protectimus password.
- Change Password. Allows users to change their Protectimus passwords.
- Change Email Address. Allows users to change the email address registered with Protectimus.
- Change Contact Phone Number. Allows users to change their phone number registered with Protectimus.
- Change Login. Allows users to change their Protectimus usernames. Important: when integration with other services has been set up, links between systems are usually login-based. For this reason, if users change their logins on only one system, Protectimus may become unable to identify them. This may also break business logic when communicating with third-party services.
- Change First Name and Last Name. Allows users to change their first and last name registered with Protectimus.
- Manage User Environment: Experimental feature for smart user identification. When logging into the system, the degree of correspondence between the user’s current environment and the environment they typically log in from will be evaluated.
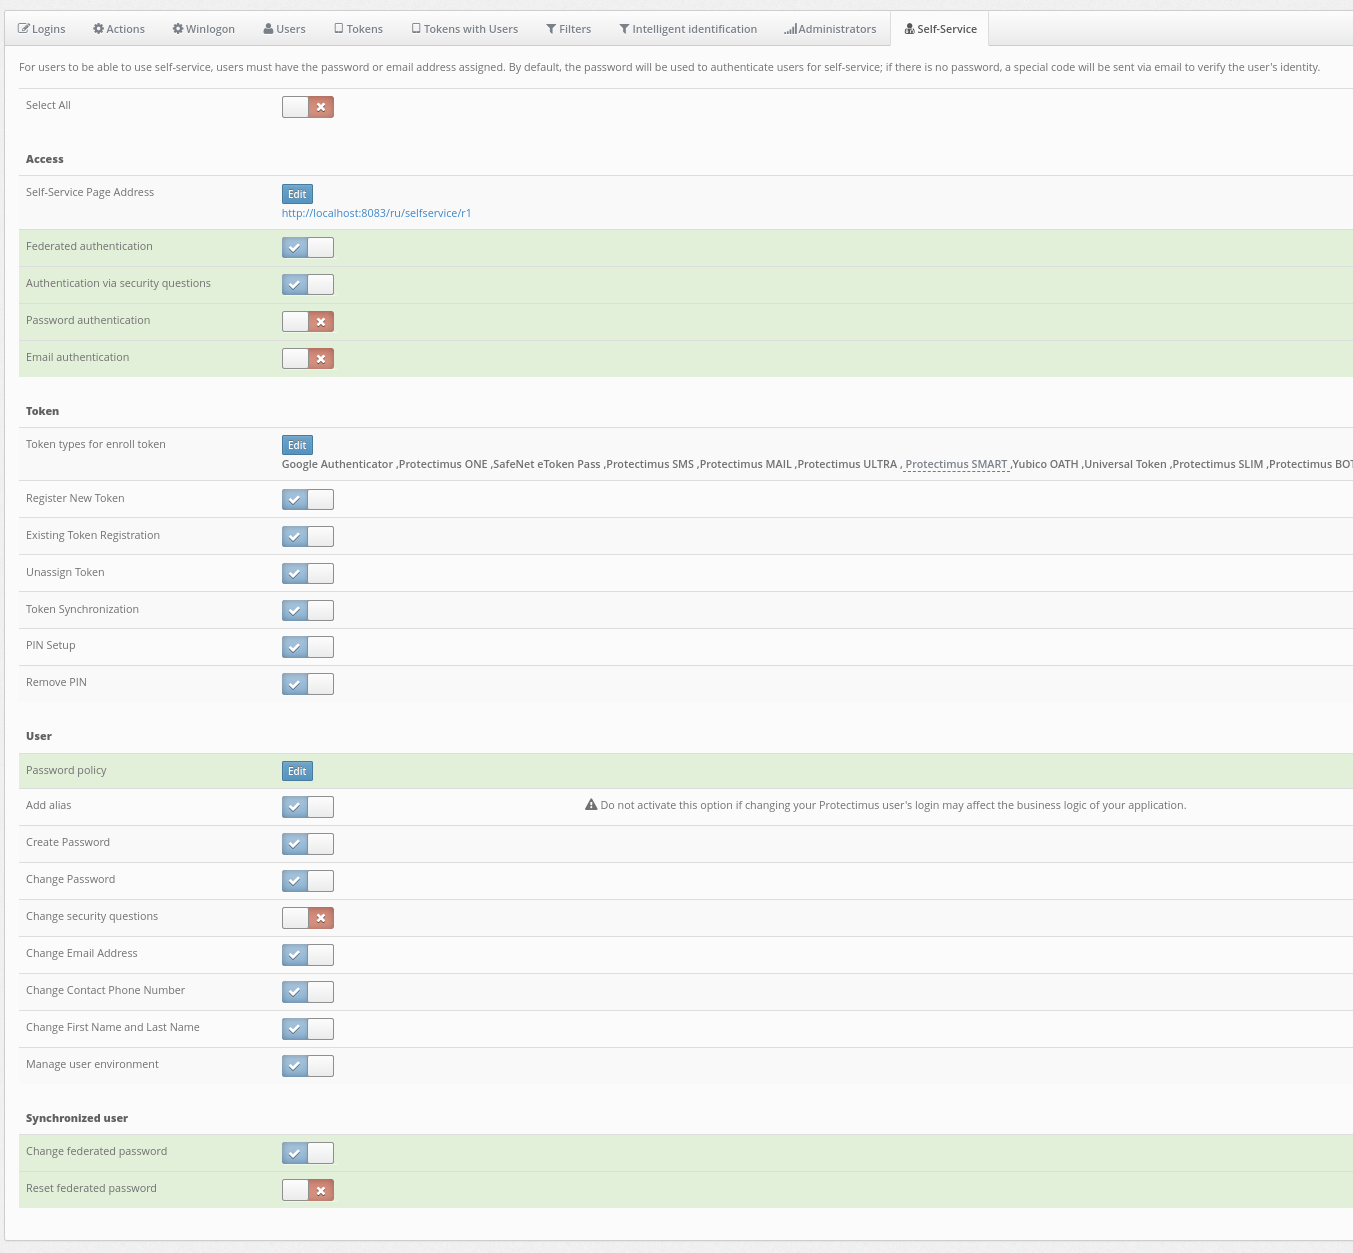
2.2. If you use the Protectimus On-Premise Platform
All these access methods can be enabled simultaneously without conflicts. If both Federated Auth and Password Auth are enabled, users can log into the Self-Service Portal using either the AD password or the Platform password; both will be valid:
- Federated Auth: Users log into the Self-Service Portal using their password from Active Directory (AD). If enabled, setting the user’s password within the Protectimus Platform is not required.
- Auth via Security Questions: Users log into the Self-Service Portal by answering secret questions.
- Password Auth: Users log into the Self-Service Portal using the password set in the Users’ settings within the Protectimus Platform.
- Email Auth: Users log into the Self-Service Portal using a one-time code sent to the email specified in the Users’ settings within the Protectimus Platform.
- Password Policy: This feature allows you to set policies for users, enabling them to change/create a password themselves after logging into the Self-Service Portal.
- Change Federated Password: By enabling this feature, you grant users permission to change their AD password through the Self-Service Portal. To change the AD password, they will need to specify both the old and new AD passwords.
- Reset Federated Password: Enabling this feature grants users permission to reset the AD password through the Self-Service Portal, requiring only the specification of the new password.
NOTE:
- Changing and resetting the password in AD using the Self-Service Portal (SSPR) works only via LDAPS (SSL) connection; it does not work via LDAP.
- The option to change passwords in AD using the Self-Service Portal (SSPR) is available exclusively for users synchronized from AD; it is not applicable to DSPA users.
- If you use SSPR (Self-Service Password Reset) features for changing or resetting AD passwords, you must configure an LDAPS (SSL) certificate.
3. Give Your Users Access to Protectimus User’s Self-Service Portal
To log into the Self-Service Portal, your users will need:
- Either a password or an email registered in the Protectimus platform.
Users with both a password and a registered email address will use the password. For those with only an email, a verification code will be sent to the registered email address. If necessary, you can add passwords or emails in User settings.
- The link specified when enabling the Self-Service Portal.
Users should follow this link to log into their Self-Service Portal account, where they will see the available actions. Then, they should click the respective button and follow the required sequence of steps to complete their chosen action.
4. How to Set Up an LDAPS SSL Certificate (for On-Premise Platform)
In the Protectimus On-Premise Platform, SSPR (Self-Service Password Reset) features for changing or resetting AD passwords work only over LDAPS (SSL). To use them, you must configure an LDAPS (SSL) certificate.
To establish LDAPS (LDAP over SSL/TLS) and import the necessary SSL certificate into a Java keystore, you need to obtain the certificate from the LDAP server itself.
Here’s how to get the SSL certificate and import it.
4.1. Obtain the LDAP Server’s SSL Certificate
- From the LDAP Administrator: The most straightforward method is to request the certificate file (e.g., a .cer or .crt file) from your LDAP server administrator. This certificate will be issued by a Certificate Authority (CA) that your Java environment needs to trust.
- Using keytool to retrieve directly: If you have network access to the LDAP server and the keytool utility (part of the Java Development Kit/JRE), you can extract the certificate directly.
keytool -printcert -sslserver <hostname>:<ssl_port> -rfc > ldap_server_certificate.cer
Replace <hostname> with the LDAP server’s hostname and <ssl_port> with the LDAPS port (commonly 636 or 3269 for Active Directory Global Catalog).
4.2. Import the Certificate into the Java Keystore:
- Locate your cacerts file: The default Java truststore is typically named cacerts and is located in the jre/lib/security directory of your Java installation (JDK or JRE).
- Import using keytool: Use the keytool command to import the obtained certificate into your cacerts file.
keytool -importcert -alias <unique_alias> -file ldap_server_certificate.cer -keystore <path_to_cacerts> -storepass <keystore_password>
- Replace <unique_alias> with a descriptive, unique name for the certificate (e.g., ldap_server_cert).
- Replace ldap_server_certificate.cer with the actual path to your certificate file.
- Replace <path_to_cacerts> with the full path to your cacerts file.
- Replace <keystore_password> with the password for the cacerts file (the default is often changeit).
After importing the certificate, your Java application will be able to establish a secure LDAPS connection to the LDAP server, as it will now trust the server’s SSL certificate. Remember to restart any applications that use this JRE to ensure the new certificate is loaded.