Implementing Two-Factor Authentication in MikroTik VPN
This guide describes how to enable Protectimus Two-Factor Authentication (2FA) for users connecting to MikroTik VPN.
The Protectimus two-factor authentication system can be integrated with MikroTik VPN via RADIUS authentication protocol. For this purpose, you need to install an on-premise Protectimus RADIUS Server component and configure the MikroTik VPN to refer to the Protectimus RADIUS Server for user authentication.
See how Protectimus two-factor authentication solution works for MikroTik VPN in the scheme below.
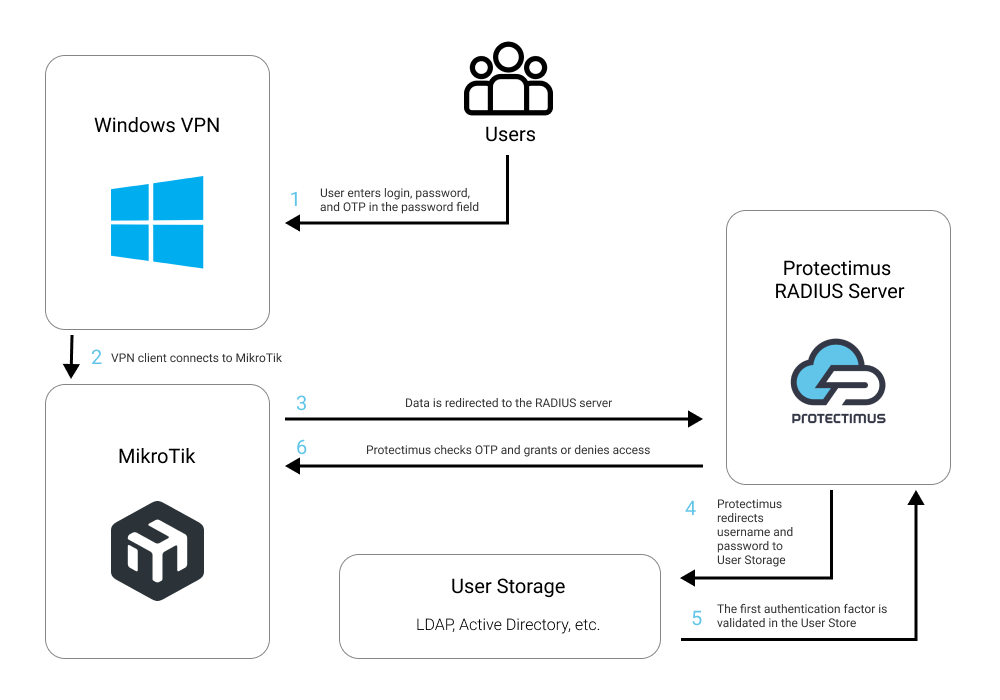
1. How MikroTik VPN Two-Factor Authentication (2FA) Works
After integrating MikroTik VPN with the Protectimus MFA system, your users will need to pass two stages of authentication to connect to MikroTik VPN:
- Enter their username and password.
- Enter the one-time passcode, which is only valid for 30 seconds.
To generate one-time passcodes, the following types of two-factor authentication tokens will be available to your users:
- Classic and programmable hardware OTP tokens that look like keyfobs and plastic cards;
- 2-factor authentication app Protectimus SMART OTP on iOS and Android;
- Any other 2-factor authentication apps that support TOTP auth standard, including Google Authenticator;
- Delivery of one-time passwords using chatbots in Telegram, Messenger, or Viber;
- SMS authentication;
- Delivery of one-time passwords via email.
It is a challenging task for the intruder to hack two authentication factors that differ in their nature (something the user knows and owns) and use them simultaneously within 30 seconds (the time when the one-time password remains active). That is why two-factor authentication is one of the best security measures for MikroTik VPN.
2. How to Enable MikroTik VPN 2FA
You can set up MikroTik VPN two-factor authentication (2FA) with Protectimus using the RADIUS protocol:
- Get registered with Protectimus SAAS Service or install the On-Premise 2FA Platform and configure basic settings.
- Install and configure Protectimus RADIUS Server.
- Configure MikroTik VPN Client.
- Configure Windows VPN.
2.1. Get Registered and Configure Basic Protectimus Settings
Choose your deployment option and complete the basic setup:
Protectimus Cloud Service
- Register with the Protectimus Cloud Service and activate API.
- Add a Resource.
- Add Users.
- Add Tokens manually or activate the Users’ Self-Service Portal.
- Assign Tokens to Users.
- Assign Users and Tokens to the Resource.
Protectimus On-Premise Platform
- Install the Protectimus On-Premise Platform. If you install the Protectimus Platform on Windows, select the RADIUS option during installation.
- Add a Resource.
- Add Users.
- Add Tokens manually or activate the Users’ Self Service Portal.
- Assign Tokens to Users.
- Assign Tokens with Users to the Resource.
2.2. Install and Configure Protectimus RADIUS Server
Detailed instructions for installing and configuring the Protectimus RADIUS Server for MikroTik VPN 2-factor authentication using RADIUS are available in our Protectimus RADIUS Server Installation Guide for MikroTik VPN 2FA.
2.3. Configure MikroTik VPN Client
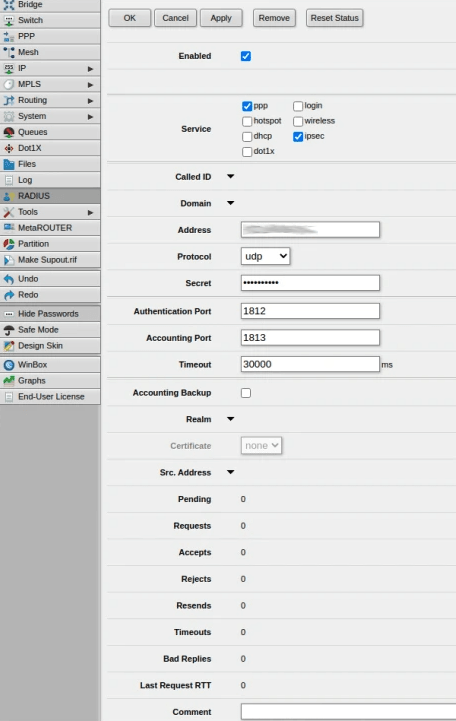
- Open Webfig.
- Navigate to the menu on the left, and select the RADIUS tab.
- Click Add New to configure your Protectimus RADIUS Server as a RADIUS server.
- Check ppp and ipsec in the Service section.
- Check login in the Service section.
- Indicate the IP of the server where the Protectimus RADIUS Server is installed.
- Set Protocol to udp.
- Indicate the shared secret you created in the Protectimus radius.yml file (radius.secret property).
- Change the default timeout to 30000 ms or higher.
- Click OK to save your settings.
- Navigate to the menu on the left, and select the PPP tab.
- Select the Interface tab and then click PPTP Server, SSTP Server, L2TP Server, or OVPN Server depending on which one you are using.
- Check pap and uncheck every other checkbox in Authentication. Click OK.
- Select the Secrets tab, and click the PPP Authentication & Accounting button.

- Check Use Radius, and click OK to finish the configuration and enable Protectimus two-factor authentica in your VPN.
2.4. Configure Windows VPN
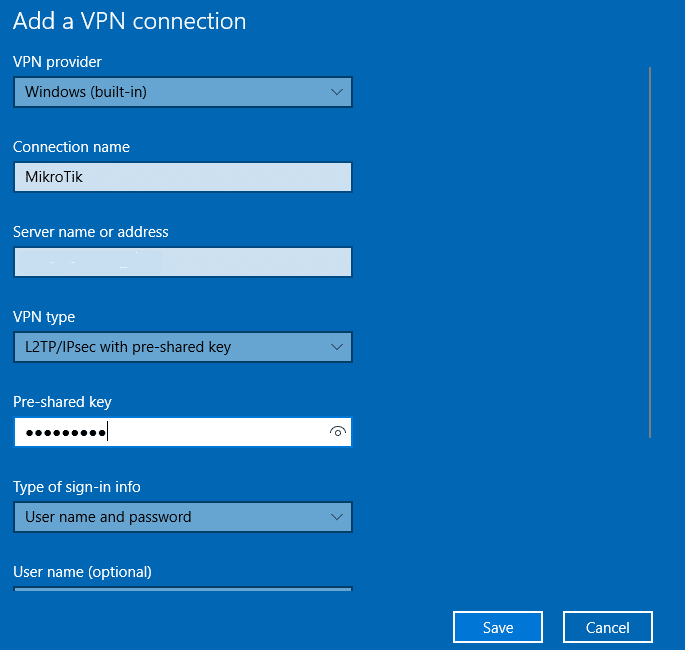
- On your Windows operating system, go to Settings –> Network & Internet –> VPN and select Add a VPN connection.
- Fill in the form and click Save. Refer to the following image and table.
| VPN Provider |
Windows (in-built) |
| Connection name |
MikroTik |
| Server name or address |
Enter the IP address of your server |
| VPN type |
Select your VPN Type. We chose L2TP/IPsec with pre-shared key, but you have to select the one you use in MikroTik. |
| Pre-shared key |
Indicate the shared secret you created in the Protectimus radius.yml file (radius.secret property) when configuring Protectimus RADIUS Server |
| Type of sign-in info |
User name and password |
| User name (optional) |
Your user name |
| Password (optional) |
Your password |
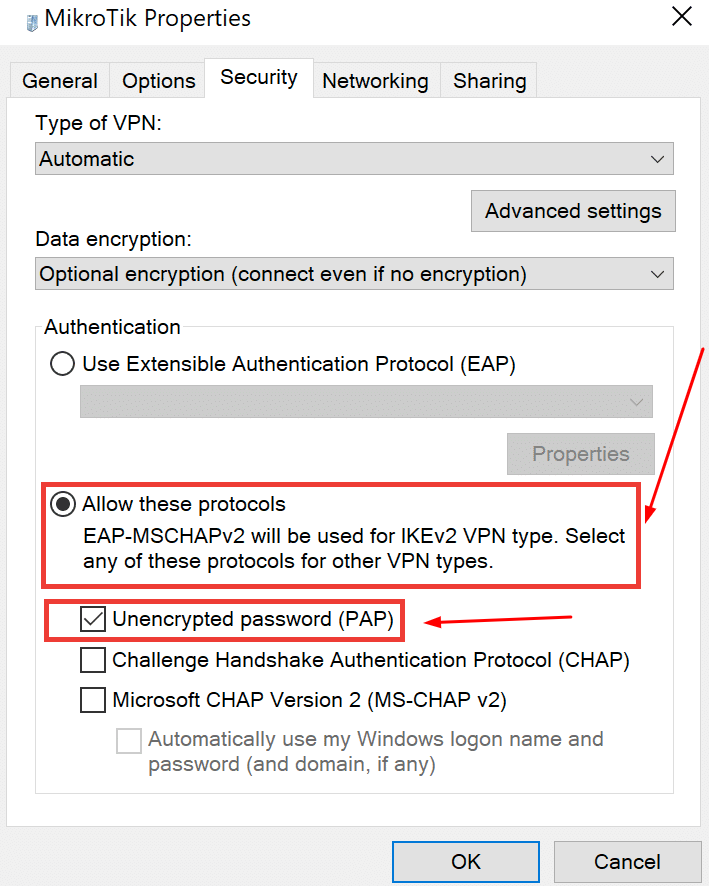
- Go to Control Panel → Network and Sharing Center and select Change adapter options.
- Right-click your newly-created MikroTik connection and select Properties.
- Select the Security tab.
- Select Allow these protocols and then check the Unencrypted password (PAP) checkbox.
- Then click OK to save the changes.
Integration of two-factor authentication (2FA/MFA) for your MikroTik VPN is now complete.
If you have other questions, contact Protectimus customer support service.