The Protectimus RADIUS 2FA solution can be used to enable two-factor authentication for any software or equipment that supports RADIUS authentication protocol.
The Protectimus RADIUS Server connector works as a RADIUS server. It transfers authentication requests from the RADIUS device to the Protectimus multi-factor authentication (MFA) server and returns the answer permitting or denying access.
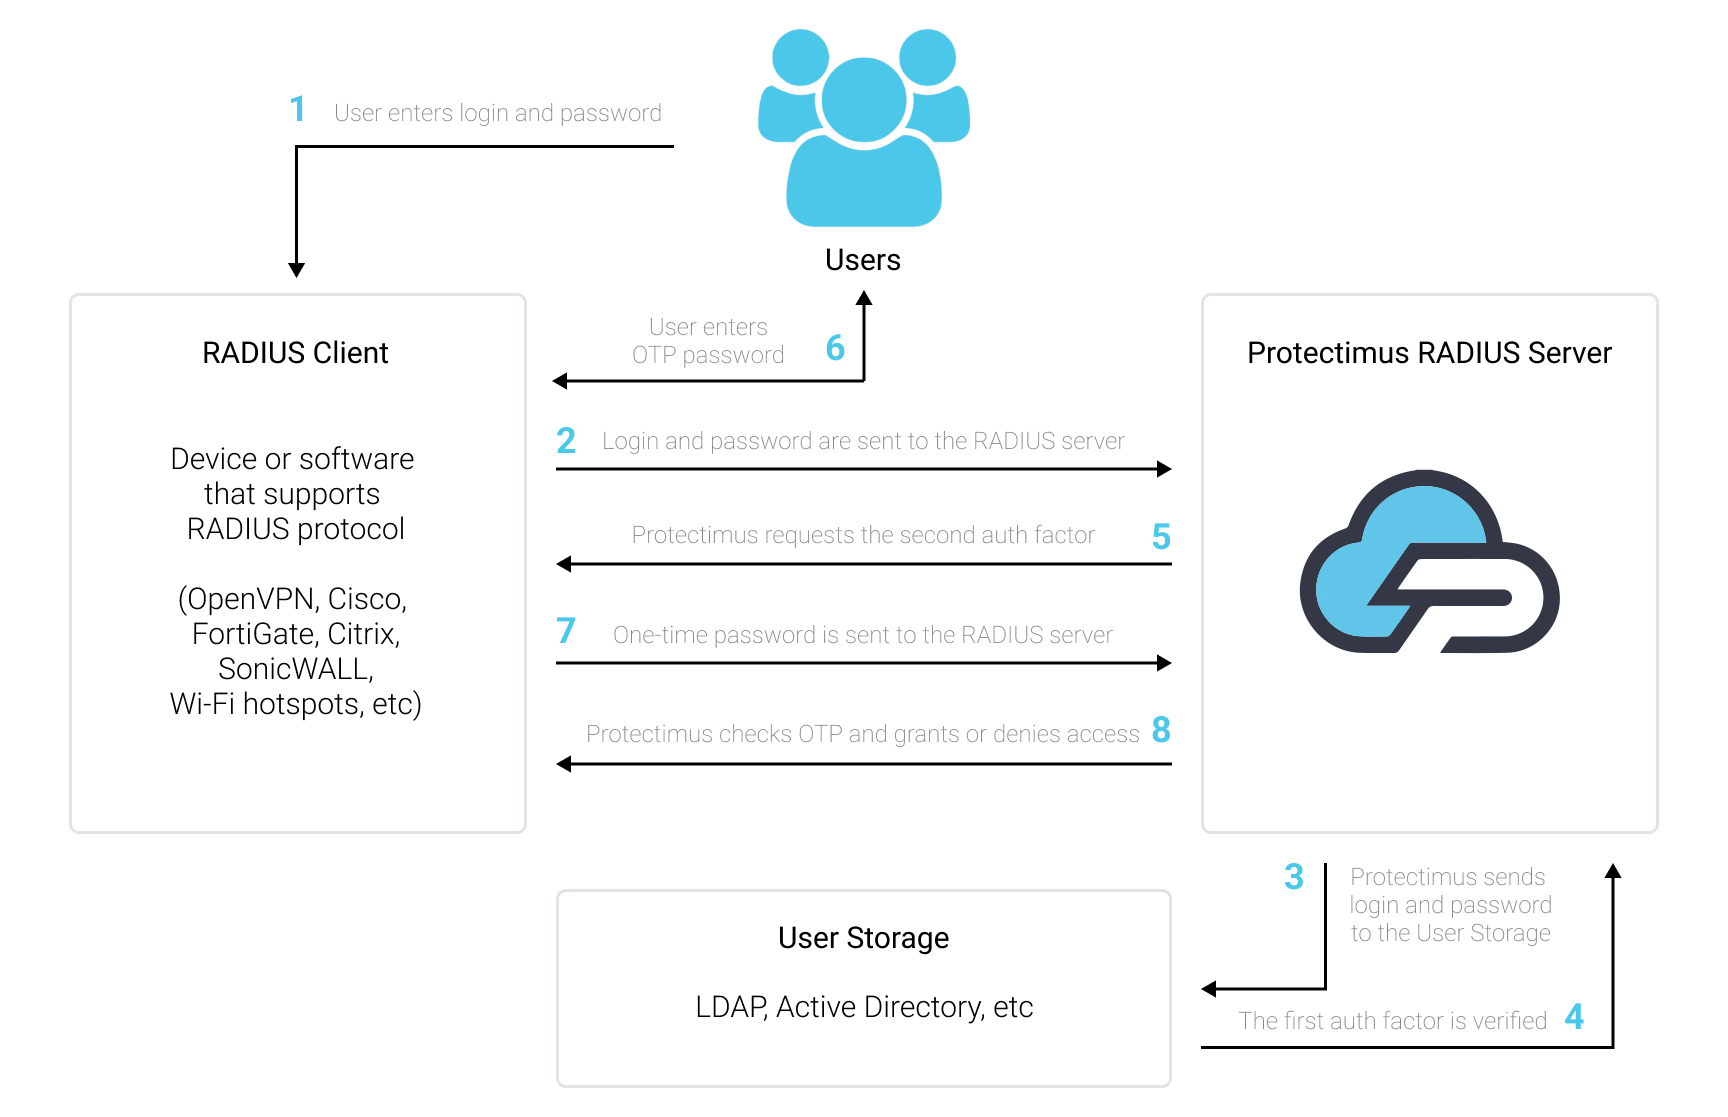
Add two-factor authentication (2FA / MFA) to protect your VPN, Wi-Fi, and any other software or device that supports RADIUS. To do that, integrate with Protectimus Cloud MFA Service or On-Premise Platform via RADIUS authentication protocol.
The list of software and devices that can be integrated with Protectimus via RADIUS authentication protocol includes but is not limited to:
The Protectimus RADIUS 2FA software is easy to set up. But if you have any questions, our team is always ready to help you with deploying RADIUS two-factor authentication (2FA) even in the most complex infrastructure. Get in touch with our support team.
To integrate Protectimus 2FA solution with your RADIUS supporting device or software you need to set up and configure Protectimus RADIUS Server, and then configure the authentication policies on the device or application you want to add Protectimus 2FA to:
- You allow the transmission of an authentication request over the RADIUS protocol to Protectimus RADIUS Server;
- The Protectimus RADIUS Server component receives and processes the authentication request;
- Then Protectimus RADIUS Server contacts the Protectimus authentication server to verify the one-time password entered by the user.
docker-compose up -ddocker-compose logs -fATTENTION!
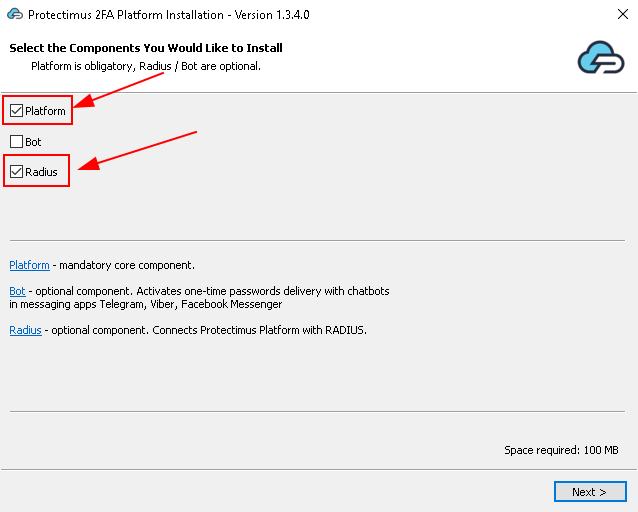
If you plan to use the Protectimus On-Premise Platform, keep the Platform checkbox checked.
If you plan to use the Protectimus SAAS Service, uncheck the Platform checkbox.
If you plan to use the
|
If you use plan to use the
|
 |
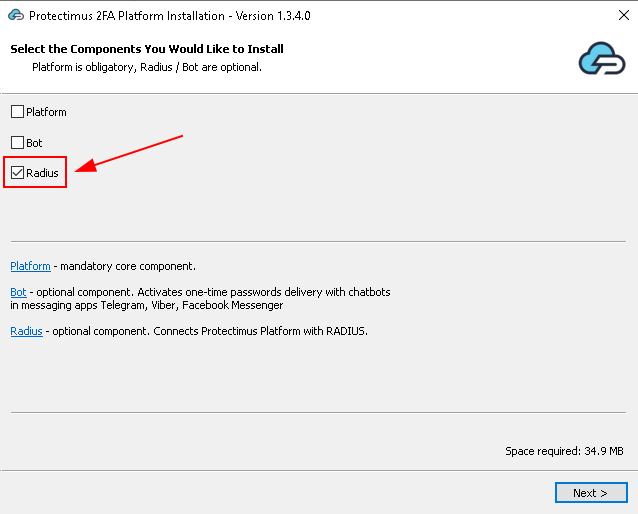 |
Choose your deployment option and complete the basic setup:
The Protectimus RADIUS Server settings can be configured by specifying them in the radius.yml file, which must be located in the same directory as the executable.
Available properties that you should add to the radius.yml file include:
auth:
	providers:
    	- LDAP
    	- PROTECTIMUS_OTP
	re-enter-otp: true
	principal-normalization: true
	bypass-otp:
    	ldap-filter: (memberOf=cn=bypass-otp,ou=groups,dc=test,dc=com)
    	usernames:
          	- john
          	- luci
	inline-mode:
    	enabled: false
       	separator: ''
       	attributes:
         	NAS-Identifier:
           	- home-nas
           	- work-nas
| PROPERTY NAME | PROTERTY STANDS FOR |
|
Could be:
|
|
When re-enter-otp is enabled, password is not requested after unsuccessful OTP check. |
|
When normalization is enabled any domain information is stripped from the username, so “username”, “DOMAIN\username” and “username@domain.com” would all resolve to a single “username” |
|
When bypass-otp is enabled, OTP is not requested for specified users. |
|
Inline mode allows you to use 2FA in case when Access-Challenge is not supported. Inline mode can be activated with ‘enabled: true’ or using request attributes that match. In this case password must be in following format ‘password,otp’, if using separator: ‘,’. |
radius:
  secret: secret
  clients:
	- name: vpn-client
  	secret: secret
  	ips:
    	- 10.0.0.0/24
  auth-port: 1812
  listen-address: 0.0.0.0
  dictionaries:
	- file:<some_path>/<some_name>.dat
  attributes:
	copy-state: true
	defaults:
  	Service-Type: NAS-Prompt-User
	for-users:
  	john:
    	Service-Type: Login-User
	ldap:
  	memberOf:
    	'[cn=admins,ou=groups,dc=test,dc=com]':
      	Service-Type: Administrative
  	uid:
    	john_wick:
      	Class: Pro
	conditional:
  	'[ldapUser.attributes["uid"] == "john"]':
    	Service-Type:
      	- Login-User
  	'[request.getAttributeValue("User-Name") == "john"]':
    	Class:
      	- RDP_HeadOffice_GP
  ip-attributes:
	- NAS-IP-Address
	- NAS-IPv6-Address
| PROPERTY NAME | PROPERTY STANDS FOR |
|
The secret to be used by your RADIUS server. |
|
Clients with specific secrets (Clients are resolved based on IP address). Each client MUST have a unique name. |
|
The port where the RADIUS server will run. |
|
The IP address the server listens on. |
|
Attribute list extension for RADIUS. Find an example of the dictionary extension in the Dictionary Example section. |
|
Attributes that will be returned in response on successful authentication. |
|
Copies each returned attribute into the response. |
|
Attributes for all users. |
|
Attributes for specific users. |
|
Attributes for specific user or group of users in LDAP. |
|
When conditional is enabled, it allows to specify a script that will check the condition under which the attribute will be returned. |
|
Attributes that will return an IP address of the incoming request using the specified attribute. |
protectimus-api:
	login:
	api-key:
	url: https://api.protectimus.com/
resource-id:| PROPERTY NAME | PROTERTY STANDS FOR |
|
Your login in the PROTECTIMUS system. |
|
Your API key in the PROTECTIMUS system. |
|
If you are using the PROTECTIMUS cloud service, specify the following API URL: https://api.protectimus.com/ If you are using the Protectimus on-premise platform, the API URL will be something like: protectimus.api.url=http://127.0.0.1:8080/ |
|
ID of the resource that you created in the PROTECTIMUS system. |
ldap:
  base: dc=test,dc=com
  urls:
	- ldap://127.0.0.1:389
  username: admin@test.com
  password: secret
  principal-attribute: userPrincipalName
  custom-filter: (memberof=cn=managers,ou=groups,dc=test,dc=com)
| PROPERTY NAME | PROTERTY STANDS FOR |
|
The LDAP DN of Group or organizational unit containing all of the users you wish to permit to log in. |
|
The hostname or IP address of your domain controller. |
|
Is used for LDAP authentication by defined attribute. If you want to authenticate user with “sAMAccountName” instead of “userPrincipalName”, specify the attributes “query-attribute” and “principal-attribute” accordingly |
|
Is used to restrict which users are allowed to authenticate. |
proxy:
  secret: secret
  auth-port: 1812
remote-address: 192.168.1.1| PROPERTY NAME | PROTERTY STANDS FOR |
|
The secret to be used by your RADIUS_PROXY server. |
|
The port where the RADIUS server will run. |
|
IP address of the PROXY_RADIUS server. |
ad:
  urls:
	- ldap://127.0.0.1:389
  domain: test.com
radius:
  secret: secret
  clients:
	- name: vpn-client
  	secret: secret
  	ips:
    	- 10.0.0.0/24
  auth-port: 1812
  listen-address: 0.0.0.0
  dictionaries:
	- file:/.dat
  attributes:
	copy-state: true
	defaults:
  	Service-Type: NAS-Prompt-User
	for-users:
  	john:
    	Service-Type: Login-User
	ldap:
  	memberOf:
    	'[cn=admins,ou=groups,dc=test,dc=com]':
      	Service-Type: Administrative
  	uid:
    	john_wick:
      	Class: Pro
	conditional:
  	'[ldapUser.attributes["uid"] == "john"]':
    	Service-Type:
      	- Login-User
  	'[request.getAttributeValue("User-Name") == "john"]':
    	Class:
      	- RDP_HeadOffice_GP
  ip-attributes:
	- NAS-IP-Address
	- NAS-IPv6-Address

auth:
  providers:
	- LDAP
	- AD
	- PROTECTIMUS_PASSWORD
	- PROTECTIMUS_OTP
	- RADIUS_PROXY
  bypass-otp:
	ldap-filter: (memberOf=cn=bypass-otp,ou=groups,dc=test,dc=com)
	usernames:
  	- john
  	- luci
	ips:
  	- 10.0.0.0/24
  	- 1::/64
  re-enter-otp: true
  principal-normalization: true
  inline-mode:
	enabled: false
	separator: ''

ldap:
  base: dc=test,dc=com
  urls:
	- ldap://127.0.0.1:389
  username:
  password:
  principal-attribute: userPrincipalName
  custom-filter: (memberof=cn=managers,ou=groups,dc=test,dc=com)

ad:
  urls:
	- ldap://127.0.0.1:389
  domain: test.com

protectimus-api:
  login: test@protectimus.com
  api-key: secret
  url: https://api.protectimus.com/
  resource-id: 1

proxy:
  secret: secret
  auth-port: 1812
  remote-address: 192.168.1.1
VENDOR  	12356   fortinet

VENDORATTR  12356   Fortinet-Group-Name     	1   string
VENDORATTR  12356   Fortinet-Access-Profile 	6   string
Now you need to configure your device or application to communicate with Protectimus RADIUS Server service over RADIUS protocol.
If you have other questions, contact our customer support service.