The Protectimus two-factor authentication service and on-premise platform offer a self-service feature that allows users to independently perform a number of actions related to issuing and managing their OTP tokens and their own data. The system administrator determines which actions are available to users. The list of possible actions includes:
- registration of new tokens;
- registration of existing tokens;
- re-assigning the tokens;
- unassigning the tokens;
- tokens synchronization;
- PIN setup;
- removing PIN;
- creating passwords;
- changing passwords;
- changing email addresses;
- changing contact phone numbers;
- changing logins;
- changing first names and last names;
- managing user environment.
In this article, we’ll show you how to enable the Protectimus Self-Service Portal. No matter which type of authentication server you choose – the Protectimus SAAS Service or the Protectimus On-premise Two-Factor Authentication Platform, the process of enabling the self-service portal is the same.
| Read also: On-Premise 2FA vs Cloud-Based Authentication
Important to Know Before Enabling the MFA Self-Service Portal
The self-service portal must be enabled and configured separately for each resource. Users must be assigned to an appropriate resource in order to have access to the self-service portal. Users must additionally have a password in Protectimus system or an email address on record. A verification code will be sent to the registered email address to allow users to log into the portal. If a user has both a password and a registered email address, that user will use the password to log in. After a token is issued for a user and assigned to a resource, the user will also be asked to input a password from the token when logging in.
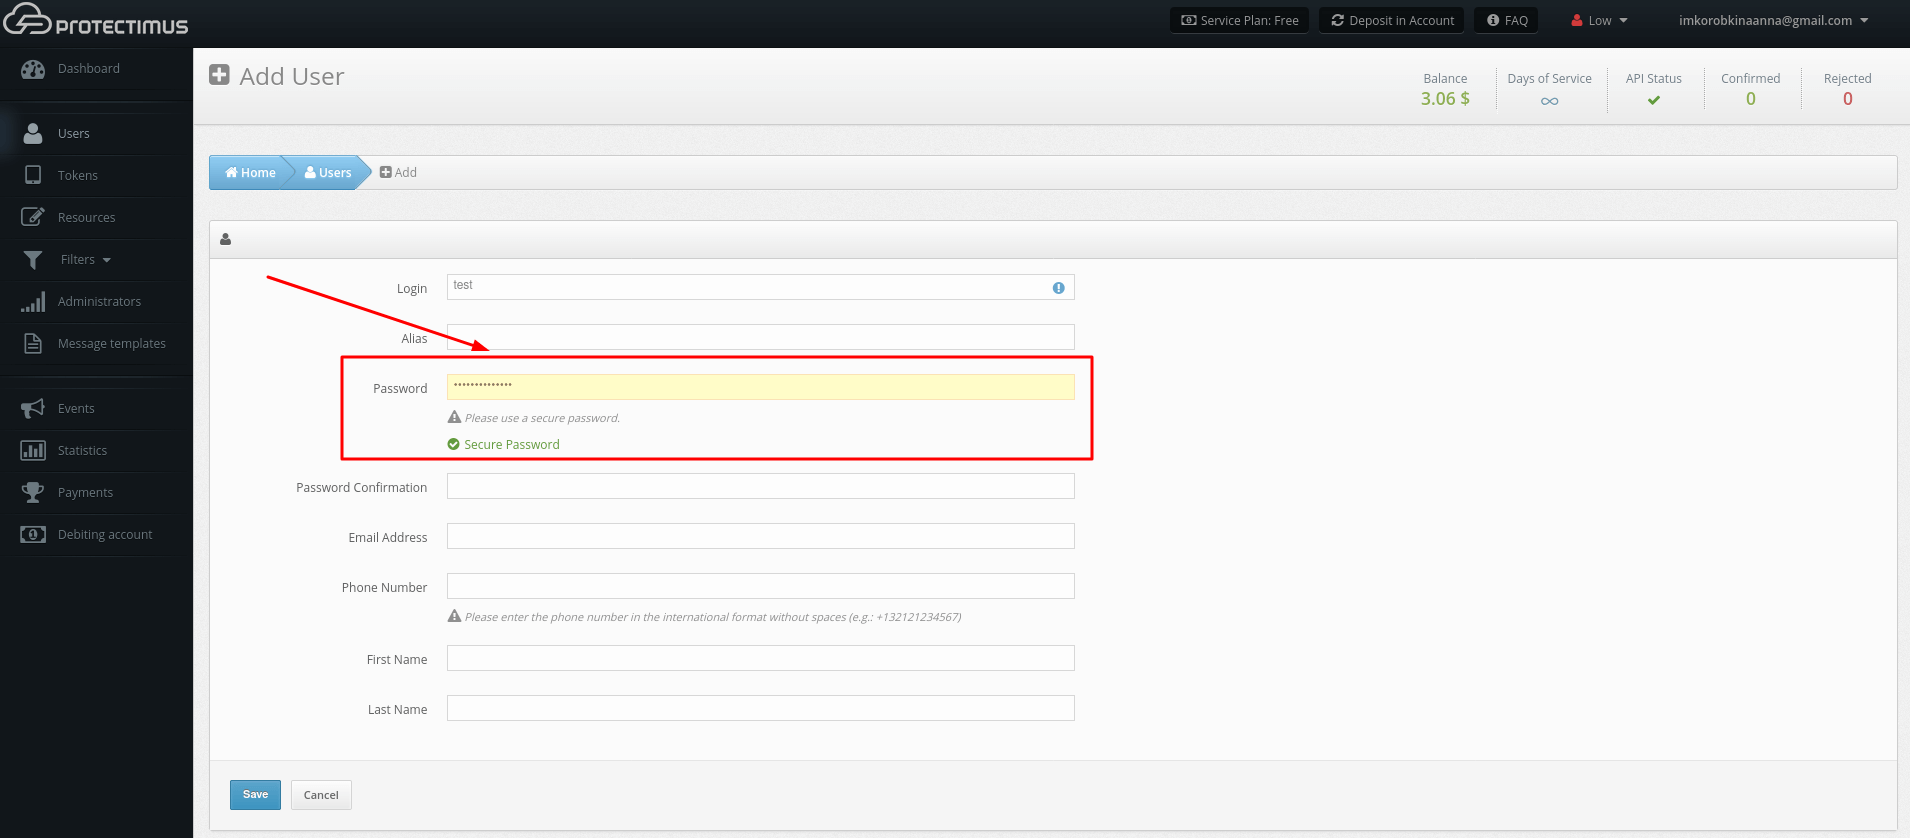
You can specify a password, email address, and other information when creating a user. You can also edit existing user records. To edit a user’s information, find them in the list of users and click the user’s login. After doing so, you’ll be taken to the page for viewing user’s detailed information. Next, navigate to the Actions tab and click the Edit button. Make any necessary changes and save them.
Some add-on components, such as Protectimus RProxy, can automatically create users that are preconfigured to use the self-service portal. For example, this occurs when RProxy is set up for Citrix NetScaler Gateway.
Enabling the Protectimus Self-Service Feature
- Navigate to the Self-Service tab
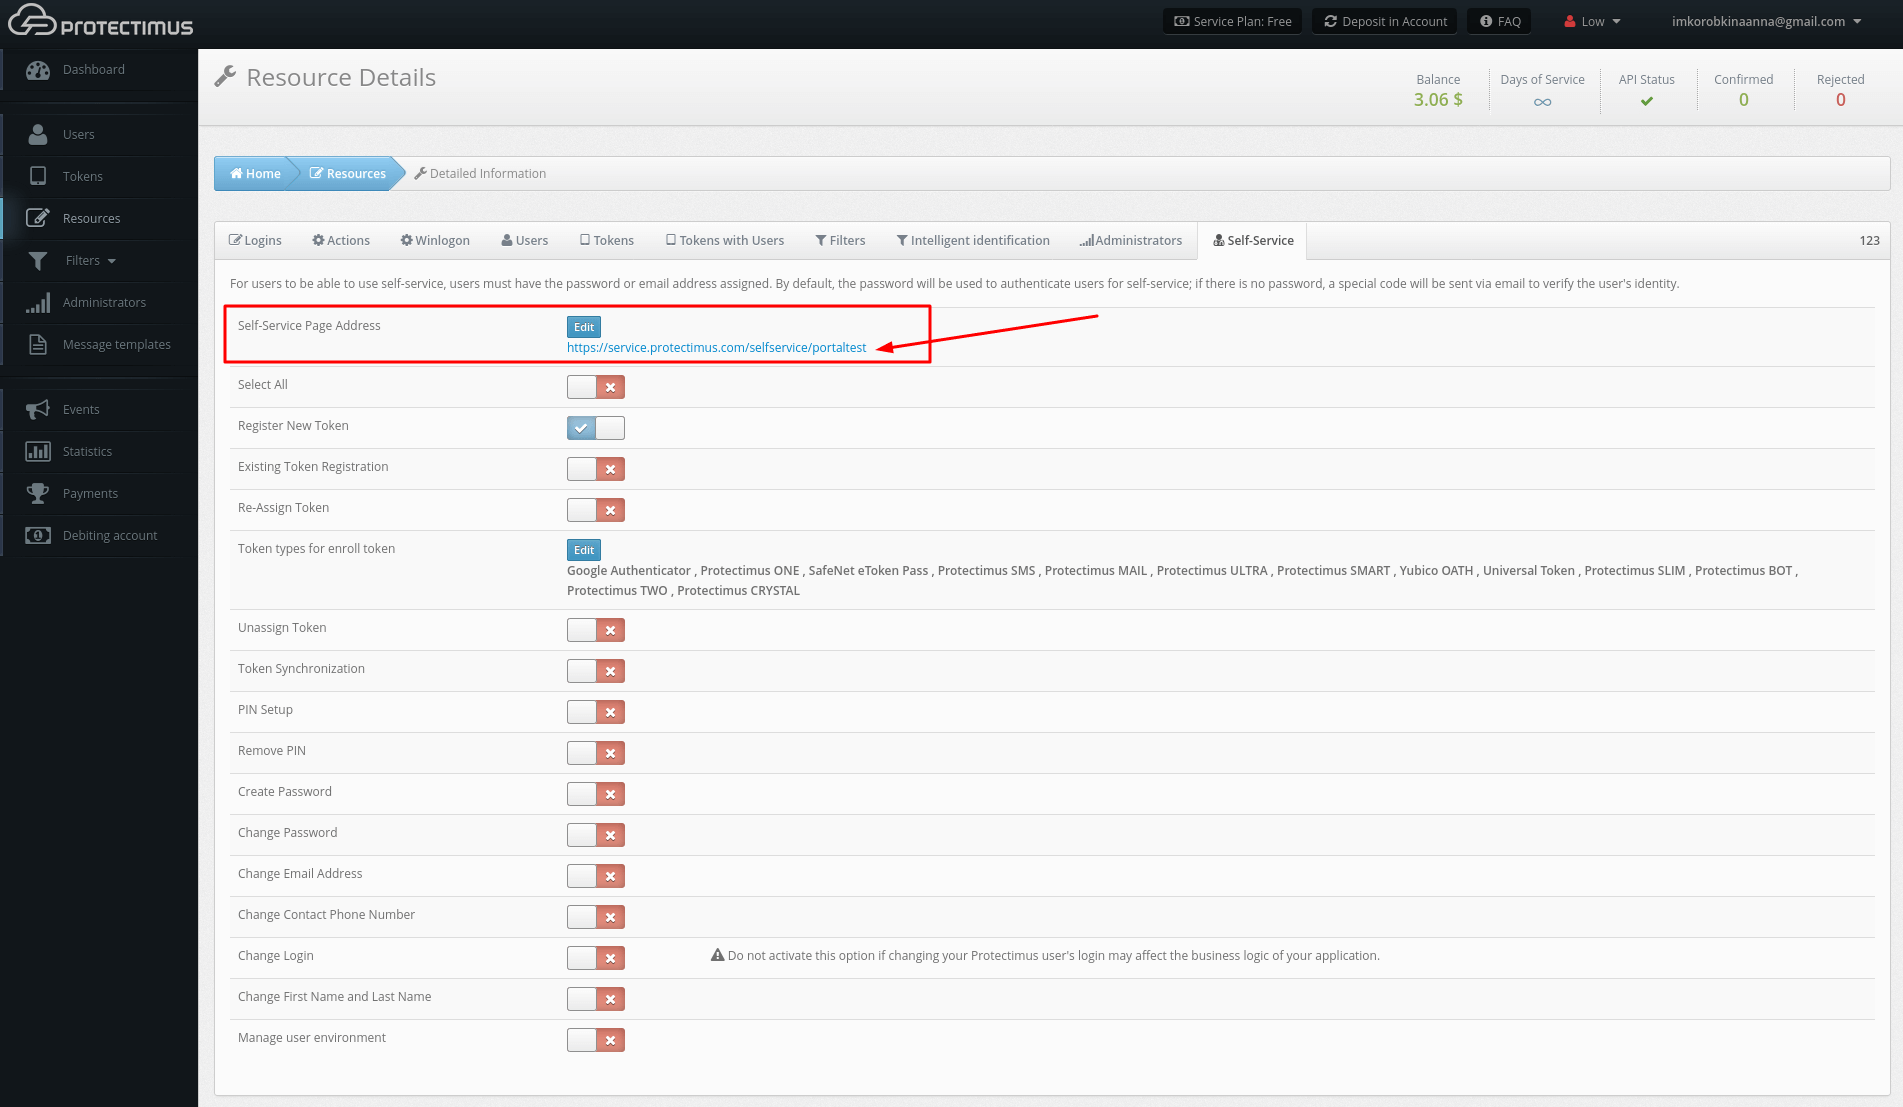
To enable the self-service feature, open the resource detailed information page by clicking its name in the resource list. Then, navigate to the Self-Service tab.

- Specify the address at which users will access the portal
When you click the link labeled “Enable User’s Self-Service for This Resource,” a window will appear where you can specify the address at which users will access the portal, as shown below. Enter just the final portion of the address, the portal alias, in the field. The full address to the portal will be the authentication server address plus the alias you specified. For example, if you’re using the Protectimus SaaS service, and you specify “portal” as the alias, the link you give to your users will look like this: https://service.protectimus.com/selfservice/portal
If you are running your own instance of the authentication platform on your own premises, the “service.protectimus.com” portion of the address will be replaced with the address to your platform instance. For example: https://localhost:8080/selfservice/portal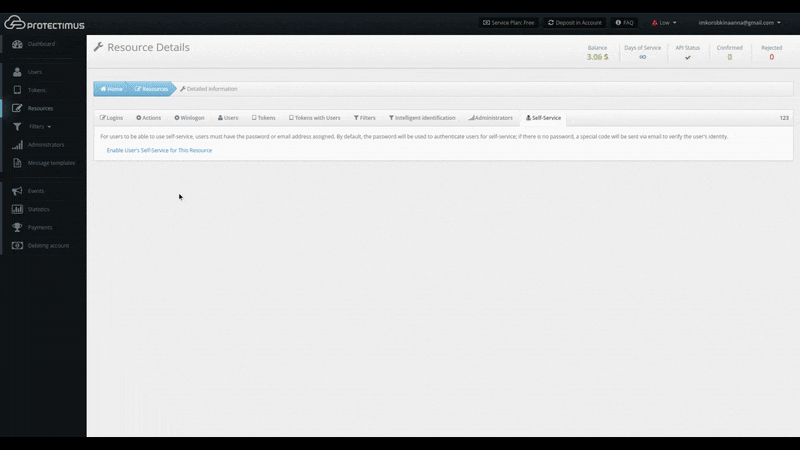
- Set up the list of actions available to users in the self-service portal
After clicking Save, you’ll see the list of actions available to your users, as shown in the image below. By default, all actions are disabled.
The action labels speak for themselves, but we’ll take a closer look at how each one works:
— Register New Token. Allows users to create, issue, and assign themselves tokens. When you enable this action, a list of token types available to users from the portal will appear. You can enable just the types of tokens you plan to work with, so that your users aren’t confused by an endless list of options. After a user creates a token, it will be assigned to this resource as a “token with user.” From that point on, the user will be required to enter a one-time password from the token when logging into the portal.
— Existing Token Registration. Allows users to confirm that they have received a token. Helpful when using physical tokens. After receiving a set of tokens, assign them to a resource and distribute them to your users as you wish. When users receive their tokens, they can input their serial numbers on their own and confirm the tokens are in their possession with one-time passwords.
— Re-Assign Token. Allows users to exchange an existing token for a new one. After performing this action, the old token will be unavailable.
— Unassign Token. Allows users to unlink a token with a user from a resource. The user will remain associated with the token. In effect, the resource assignment is changed from “token with user” to just “user.”
— Token Synchronization. Allows users to synchronize tokens if the time or counter on the device has become desynchronized from the server (more relevant for hardware tokens using TOTP and OCRA algorithms). Used primarily with physical tokens. Protectimus Smart has a built-in synchronization feature. It’s important to note that Protectimus Smart synchronizes itself with the time on Protectimus servers. If you have your own platform, be sure to set the time on it correctly.
— PIN Setup. Allows users to add a PIN to a token. When this feature is enabled, users are required to enter a four-digit code either before or after the OTP itself, depending on their settings. For example, if a user chooses “1111” as a PIN and chooses to enter the PIN after the OTP, and the user’s token generates “123456” as a one-time password, the user must input the following combination into the OTP entry field: “1234561111”.
— Remove PIN. Allows users to turn off the PIN feature.
— Create Password. Allows users to create a Protectimus password.
— Change Password. Allows users to change their Protectimus passwords.
— Change Email Address. Allows users to change the email address registered with Protectimus.
— Change Contact Phone Number. Allows users to change their phone number registered with Protectimus.
— Change Login. Allows users to change their Protectimus usernames. Important: when integration with other services has been set up, links between systems are usually login-based. For this reason, if users change their logins on only one system, Protectimus may become unable to identify them. This may also break business logic when communicating with third-party services.
— Change First Name and Last Name. Allows users to change their first and last name registered with Protectimus.
— Manage User Environment. Experimental feature for smart user identification. When logging into the system, the degree of correspondence between the user’s current environment and the environment they typically log in from will be evaluated.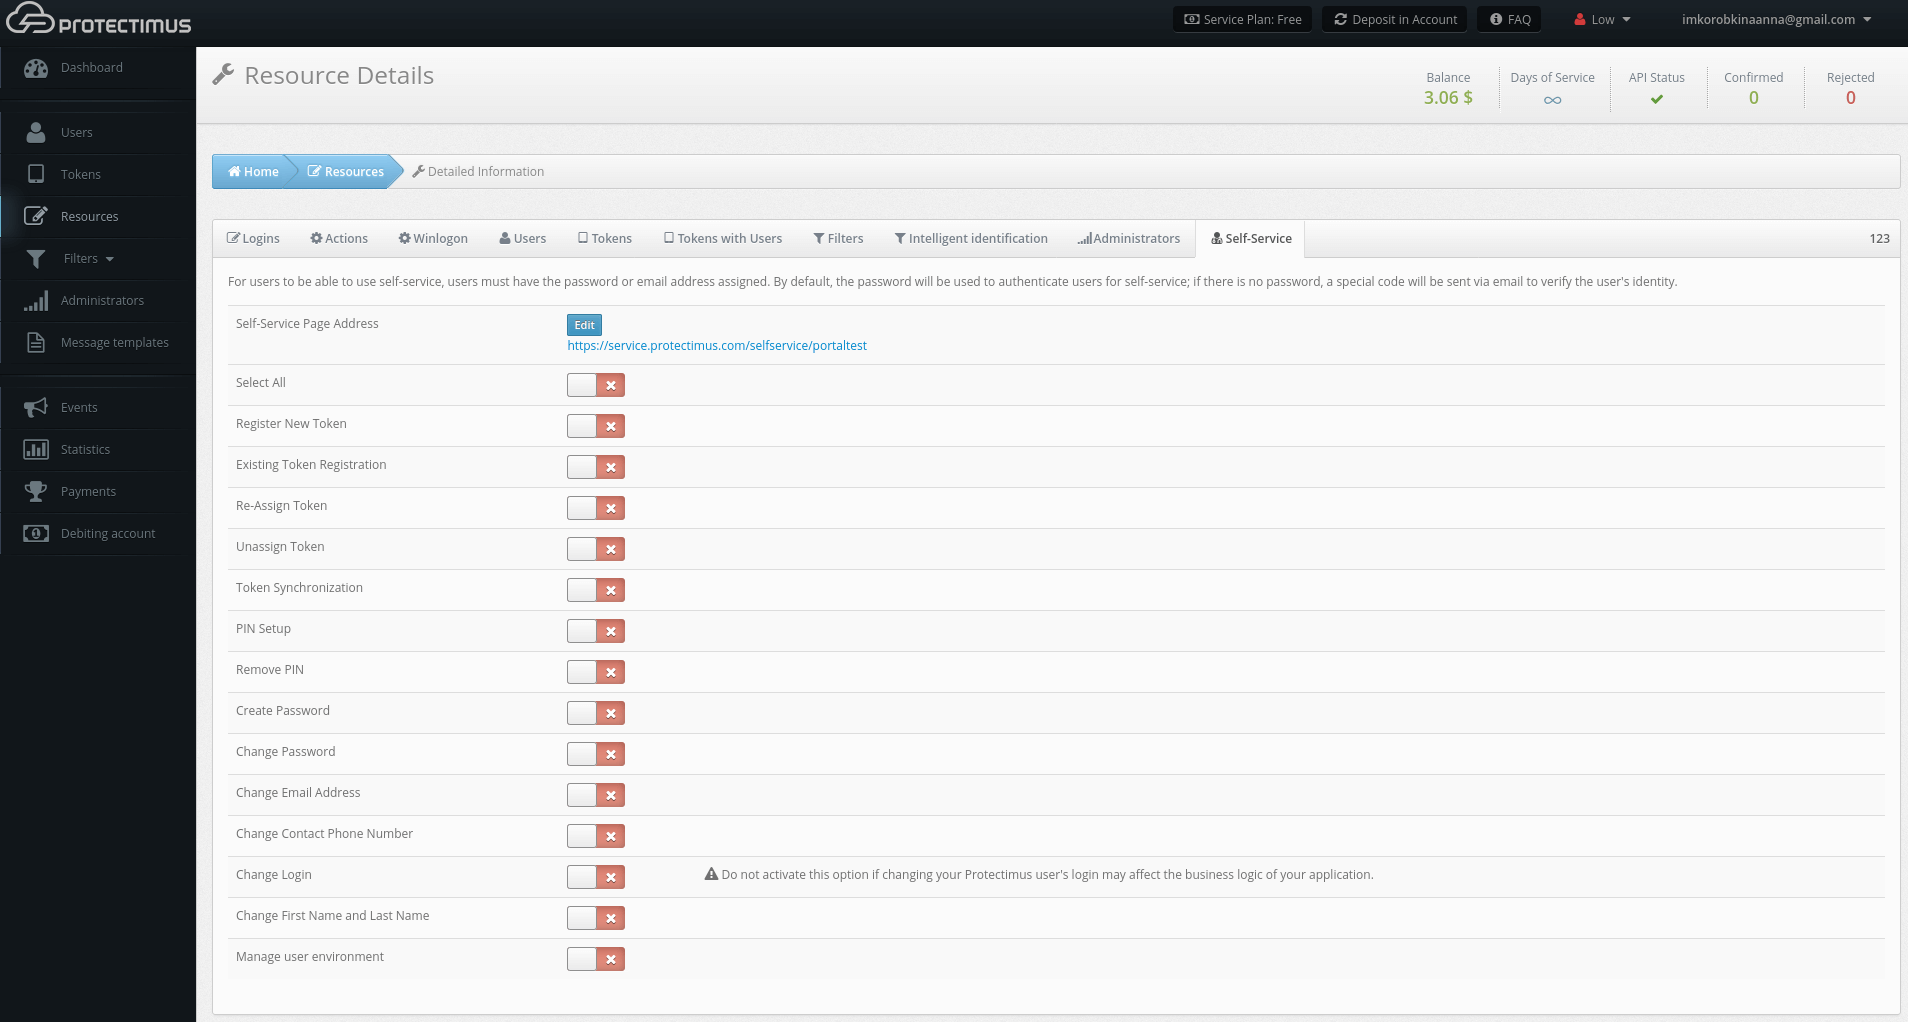
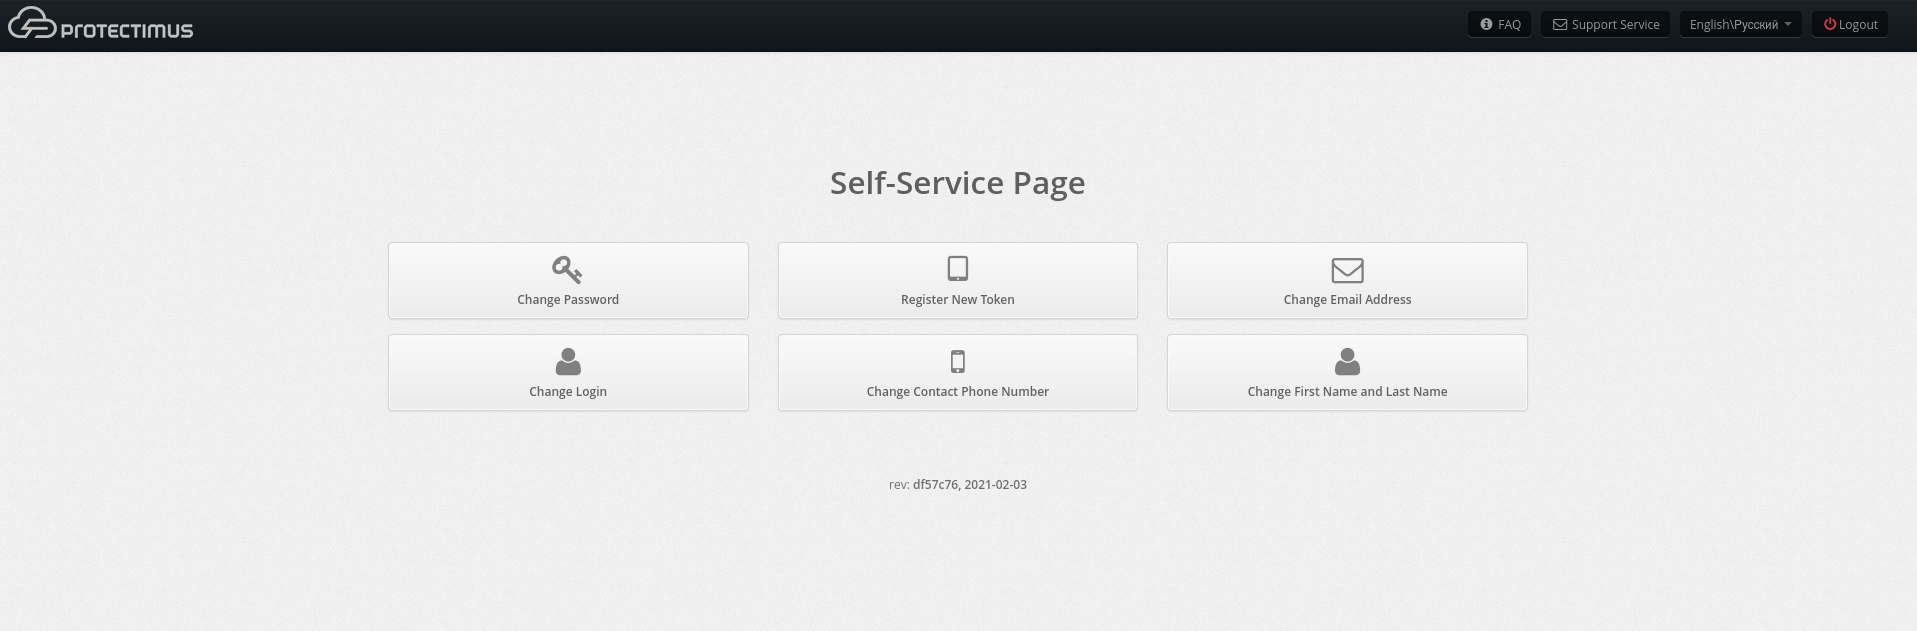
- How the Self-Service Portal page will look like for your users
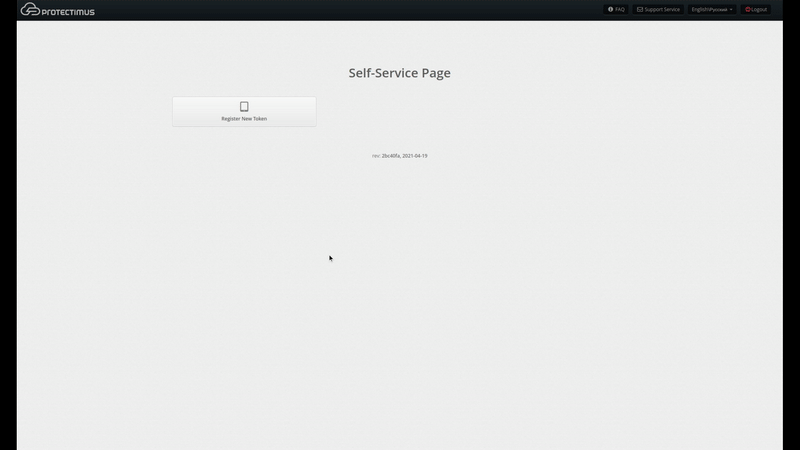
After enabling the actions required for you, the main page of the self-service portal will look like the page in the image below. If a particular action is disabled or not available to a given user, it won’t be shown on this page. You can also change the order in which the actions are displayed on this page.
| Read also: Active Directory Two-Factor Authentication
Testing the Self-Service Feature
To better understand how the self-service feature works, we recommend that administrators create a test user, with which they can test their desired features themselves.
Let’s go over the steps involved in ensuring that the token creation service is working:
1. Enable the self-service feature. Then, enable the token creation feature (Register New Token) as described above.

2. Create a user. Give the user a password and/or email address you have access to.
3. Navigate to the Resources page and assign the user you created to a resource.

4. Navigate to the self-service portal using the address you specified when enabling it.
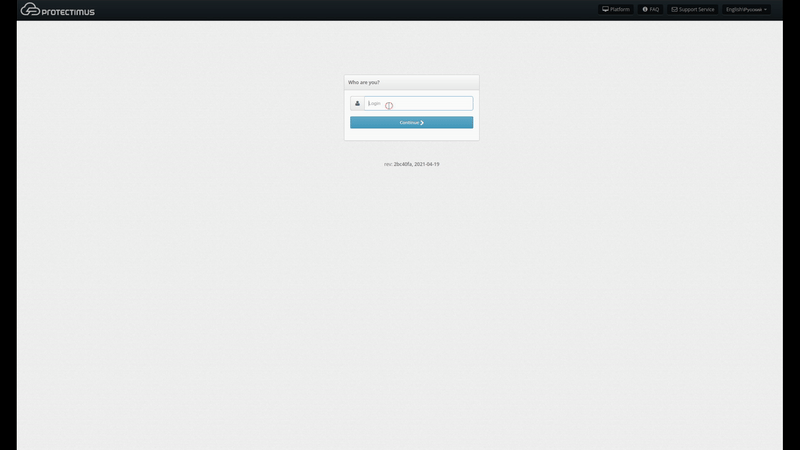
5. Login to the Self-Service Portal using the credentials of the User you’ve just created. Input the username for the user you created. Then input the user’s password or the code sent to its email address. If you specified both a password and an email address for the user, you’ll use the password to log in. If the information you entered is correct, you’ll be taken to the page with the list of available actions.
6. Now create a Protectimus Smart software token which will be automatically assigned to this user.
- Click Register New Token;
- In the modal window that appears, navigate to the Software Tokens tab.
- Choose the Protectimus Smart token.
- Give the token a name and click “Show QR Code.”
- Install and open the Protectimus Smart application on your smartphone, if you haven’t already done so. From the main screen, choose Add Token, or select it from the context menu. You’ll be asked how you would like to create the token: “Scan” lets you add a token with a QR code, and “Manual” lets you input the information on your own. Choose the “Scan” method. A QR code scanner will open in the app. Point the device at the QR code. If the scan is successful, the token will be created, and an OTP will be shown in the app.
- Input the OTP in the text area and click Save. The token will be created, and you’ll see a confirmation message. If you experience difficulties creating a token, you’ll need to synchronize your device with the server. To do so, connect the device to the internet. In the application’s menu, choose “Settings,” then choose “Time Correction” and tap “Synchronize.” Once synchronization is complete, try entering the OTP again.

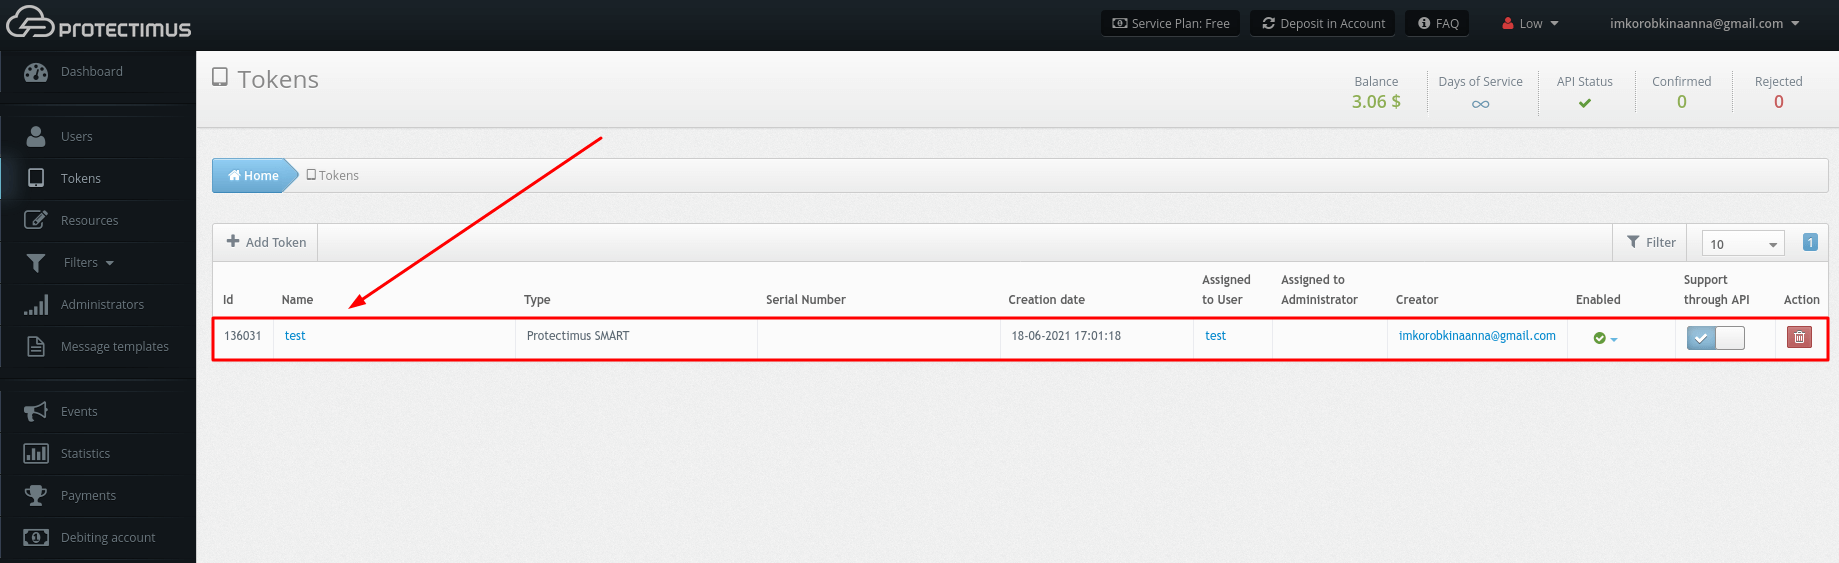
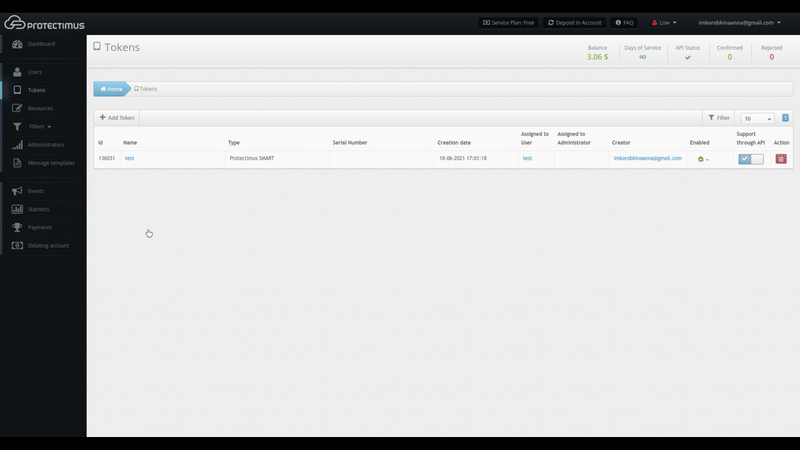
When you’ve completed all the steps successfully, the token will be created. You’ll see it in the list of tokens in Protectimus, and it will be assigned to the user that created it, as shown below.
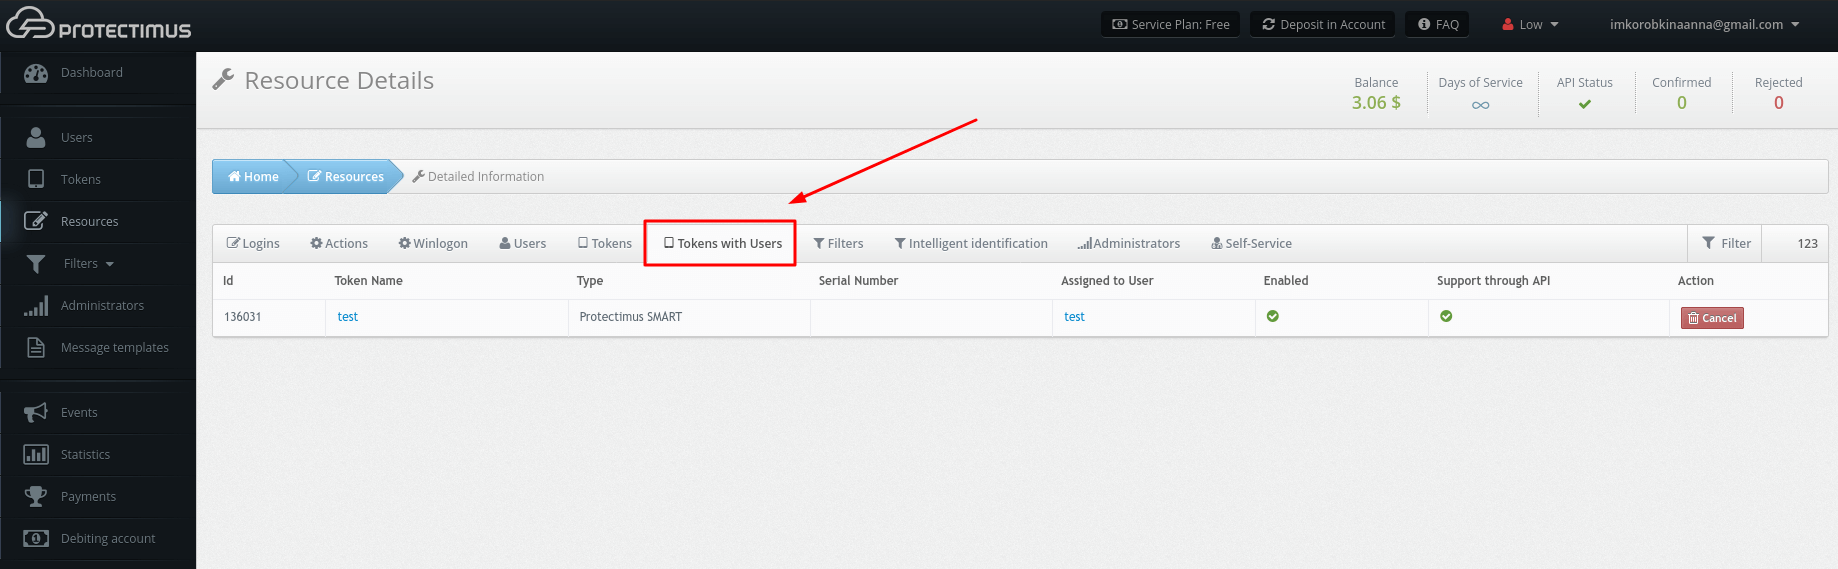
Having done so, the user’s assignment to the resource will change from “User” to “Token with user.” You can verify this from the Resource Detailed Information Page under the Tokens with Users tab, shown below.
You can verify that the token is working from the Token Detailed Information Page under the Check OTP tab, shown below. To verify that a token is working correctly, input the OTP from it and click Check OTP. Verification results will be shown in a notification to the right.
Testing What Happens in Case of Token Loss or Failure
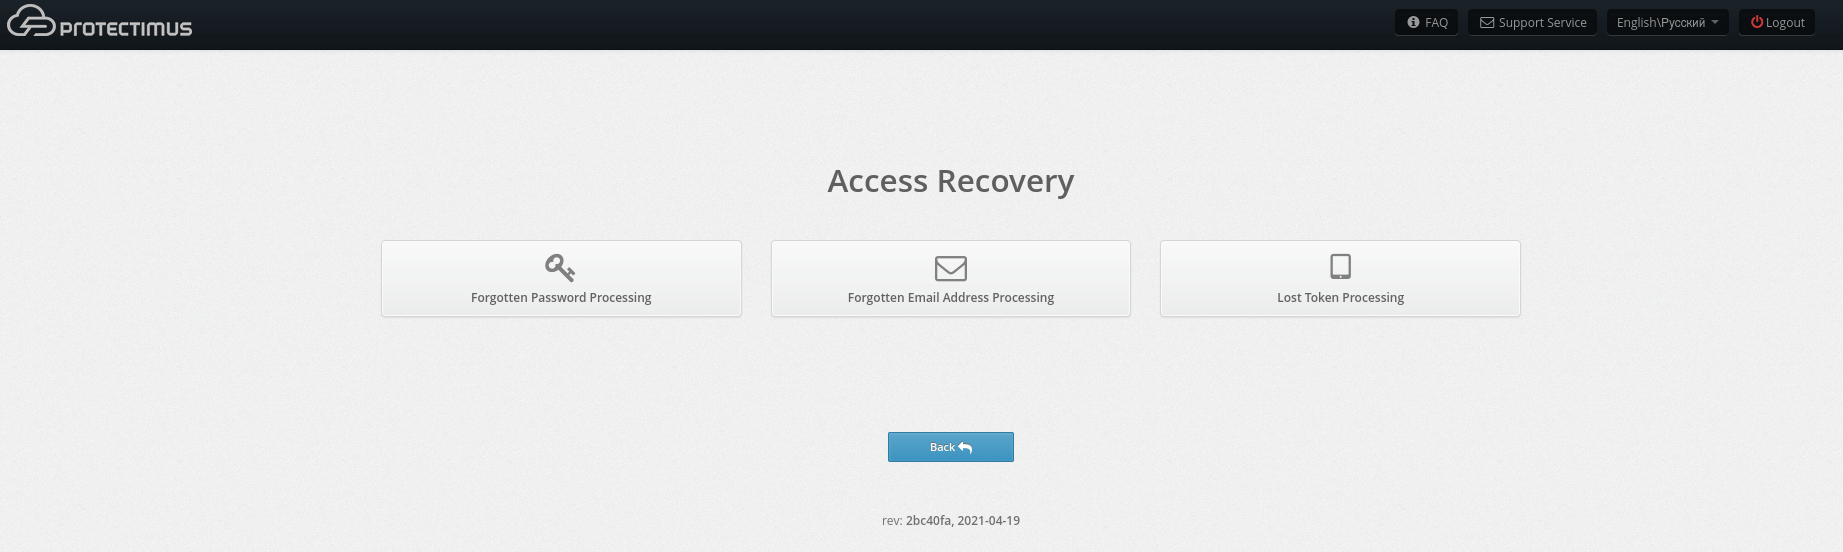
If a token is lost or becomes impossible to use, users can request a token reset from the self-service system. To do so, when logging into the portal, users must enter their usernames and click “Restore access,” beneath the password and OTP entry window. Users will then see a screen like the one shown below, where they can specify that they forgot their password, forgot their email address or lost a token.
When selecting any of these options, users will be asked to verify their identity using a remaining means of authentication. For example, if the user lost a token, they will be asked to enter their password and/or email verification code, as shown below.
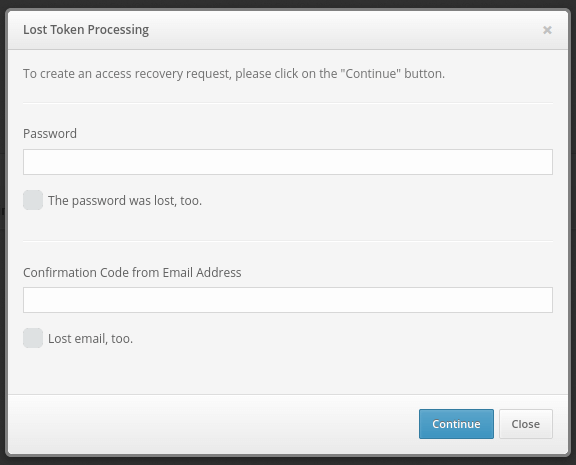
Users may have additionally forgotten their passwords or lost access to their email. Users in such a situation can mark the corresponding check boxes. Users who mark these boxes will be asked to enter new information with which they will be able to access the system.

After entering the verification codes and other requested data, a reset request for that user will be created in the system. The administrator can view it from the User Issues page, shown below. To navigate to this page, click your account name in the top-right corner of the interface. Then, choose User Issues.
Also, note that you can enable notifications for new user issues from the notification page.
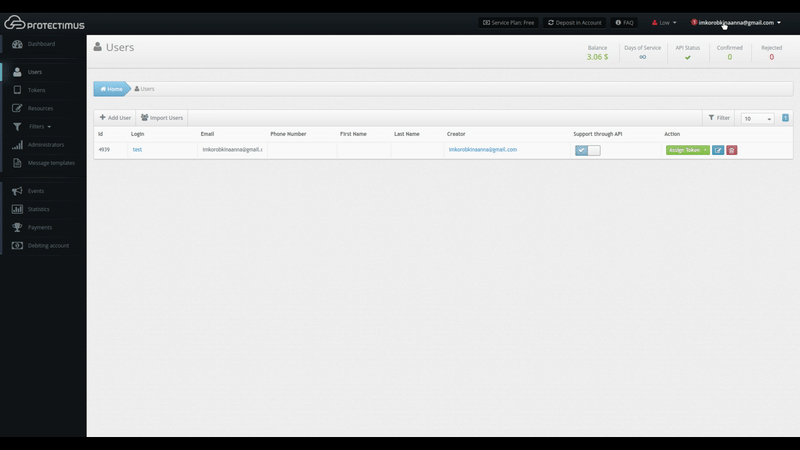
On this page, we can see that a user whose login is “test” lost their token and is unable to verify their identity using an emailed code. The token, password, and email icons in the Authenticators column are red. Authenticators the user doesn’t have are shown in gray.
After discovering such an issue, the administrator can contact the user to understand the reason for the issue and establish the user’s identity in accordance with company policies. The administrator can then approve the user’s request by clicking Verify Identity. If the request was submitted by mistake or appears fraudulent, clicking the button with the trash can icon will delete the request.
If the administrator confirms that a token was lost, the token and user will remain assigned to the resource, but the token will be disabled. (In the list of tokens, the corresponding icon will appear in the “Enabled” column.) This allows the user to log into the self-service portal without a token and issue a new one, provided that this action is permitted from the portal. If the user requested assistance with a forgotten password or change of email address, this information will be changed to the information the user specified when submitting the request.
If the user remembers the forgotten information before the request is handled, they can simply log into the portal with the old information. The request will be deleted automatically. The same holds for fraudulent data recovery attempts. When the actual user logs in, the fraudulent request will be deleted.
| Read also: Securing VPN with Two-Factor Authentication
Conclusion
The self-service feature allows you to automate a significant portion of the administrator’s work and streamline your work with your users. It’s recommended for organizations with a large number of employees, as well as for organizations with employees in disparate geographic areas.
If you have any additional questions, contact Protectimus customer service at support@protectimus.com
Read more
- 5 Steps to Prepare your Business for Multifactor Authentication
- How to Add Two-Factor Authentication to Outlook Web App (OWA)
- Two-Factor Authentication Solutions Comparison: Google Authenticator vs. Protectimus
- Best Protectimus MFA Features for Financial Services Cybersecurity
- New Programmable TOTP token Protectimus Flex
- TOTP Tokens Protectimus Slim NFC: FAQ
Subscribe To Our Newsletter
Join our mailing list to receive the latest news and updates from our team.
Subscribe To Our Newsletter
Join our mailing list to receive the latest news and updates from Protectimus blog.
You have successfully subscribed!