You can easily set up Forcepoint VPN two-factor authentication (2FA) with Protectimus’s seamless integration process, which takes only a few minutes to configure. By incorporating MFA as an additional layer of security, the Forcepoint VPN system allows only authorized users to gain access, providing a stronger defense against potential cyber threats.
In today’s world, where remote work is becoming increasingly common, it’s critical to have a secure remote access system. Protectimus multifactor authentication solution for Forcepoint VPN ensures that even if a user’s login credentials are compromised, their access to the Forcepoint VPN remains protected. Two-factor authentication provides a robust defense against potential cyber threats incuding phishing, bruteforce, social engineering, MITM and data spoofing attacks, ensuring your organization’s data and resources are kept secure.
Protectimus allows secure access to your Forcepoint VPN by providing multi-factor authentication (MFA) using the Protectimus RADIUS server.
The scheme of work of the Protectimus solution for Forcepoint VPN two-factor authentication is presented below.
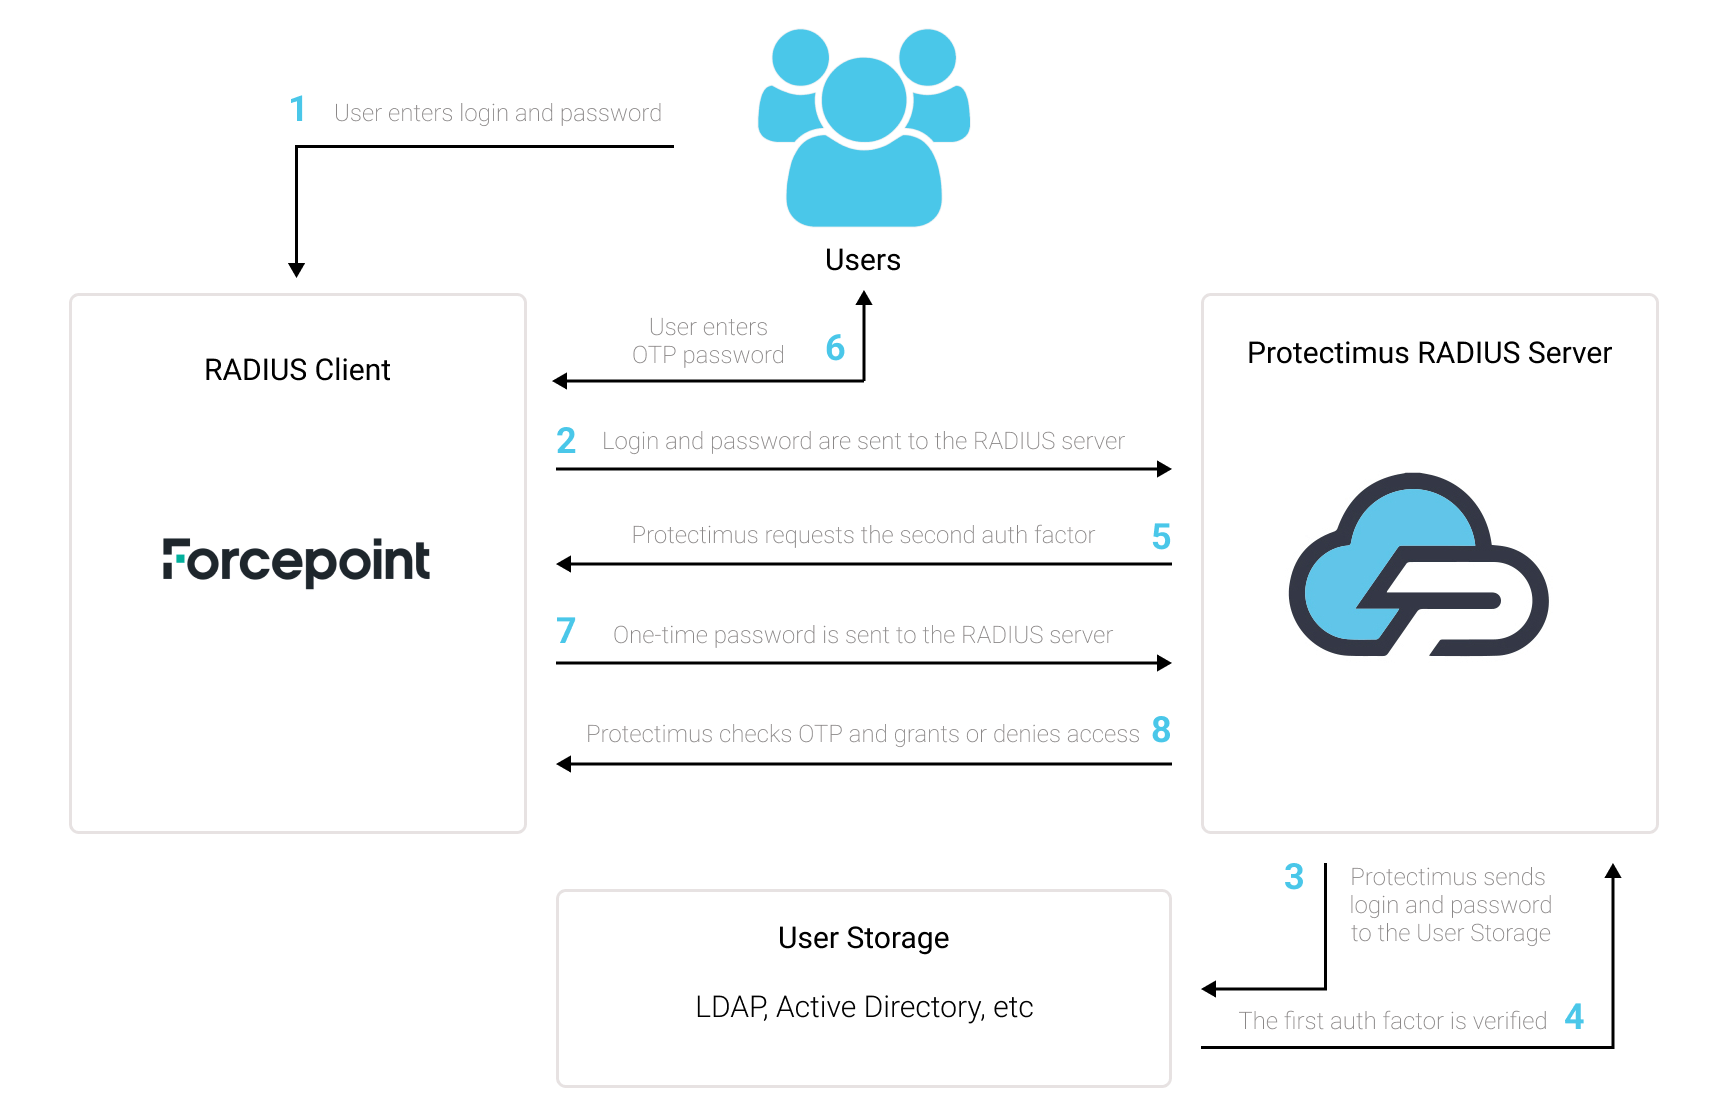
Protectimus Two-Factor Authentication Solution for Forcepoint VPN provides an extra layer of security to prevent unauthorized access to your Forcepoint VPN.
Once you enable two-factor authentication (2FA) on your Forcepoint server, your users will use two different authentication factors to get access to their accounts.
To hack a Forcepoint VPN protected with two-factor authentication (2FA/MFA), a hacker needs to get a standard password and a one-time password at once. And they only have 30 seconds to intercept a one-time password. It is almost impossible, which makes two-factor authentication so effective against most hacking attacks.
You can set up multi-factor authentication (2FA) for Forcepoint VPN with Protectimus using the RADIUS protocol:
- Get registered with Protectimus SAAS Service or install the On-Premise 2FA Platform and configure basic settings.
- Install and configure Protectimus RADIUS Server.
- Add Protectimus as RADIUS Server for Forcepoint VPN.
Choose your deployment option and complete the basic setup:
Protectimus Cloud Service
Protectimus On-Premise Platform
Detailed instructions for installing and configuring the Protectimus RADIUS Server for Forcepoint VPN 2-factor authentication using RADIUS are available in our Protectimus RADIUS Server Installation Guide for Forcepoint VPN 2FA.
| Name | Come up with a name for your RADIUS server, e.g. Protectimus RADIUS Server. |
| IP Address | Enter the IP of server where the Protectimus RADIUS Server component is installed. |
| Resolve | The IP address of the server will be automatically resolved from a domain name entered into the Name field. |
| Location | If there is a NAT device between the server and other SMC components, this field specifies the location of the server. |
| Contact Addresses | 1. Default — This option is used by default when a component belonging to another location connects to the server. 2. Exceptions — Selecting this option will open the Exceptions dialog box. |
| Port | Indicate 1812 (or whichever port you configured in the Protectimus radius.yml file when configuring Protectimus RADIUS Server). |
| Shared Secret | Indicate the shared secret you created in the Protectimus radius.yml file (radius.secret property) when configuring Protectimus RADIUS Server |
| Number of Retries | This setting specifies the number of times that Firewalls attempt to connect to the RADIUS authentication server in the event of a failed connection. |
| Timeout | This setting specifies the time (in seconds) that Firewalls will wait for a reply from the RADIUS authentication server. Set to 60 seconds. |
| Tools Profile | You can add custom commands to the server’s right-click menu. Click Select and select a Tools Profile element. |
| Name | This field displays the name of the Authentication Method. |
| Type | This field displays the authentication type. In this case: RADIUS — The RADIUS protocol is used. |
| Comment | To enter a comment, double-click on the cell. |
| Add | Clicking this option opens the Select Element dialog box, which allows you to add the selected authentication method to the Authentication Methods list. |
| Edit | Selecting this option opens the Properties dialog box for the chosen authentication method. |
| Remove | Selecting this option removes the chosen authentication method. |
Please note! The IP address used as the identity is merely a name, and the interface and IP address used for authentication-related connections are selected based on the Firewall’s routing information, like any other connection.
Integration of two-factor authentication (2FA/MFA) for your Forcepoint VPN is now complete.
If you have other questions, contact Protectimus customer support service.