Implementing Two-Factor Authentication in Windows VPN
This guide shows how to set up Windows VPN 2FA (two-factor authentication) using Protectimus multi-factor authentication system. After integrating Windows VPN with the Protectimus MFA system, to connect to Windows VPN, users will need to pass two stages of authentication:
- Enter their username and password.
- Enter the one-time passcode, which is only valid for 30 seconds.
To generate one-time passcodes, the following types of two-factor authentication tokens will be available to your users: a 2FA application on a smartphone; delivery of one-time codes via Telegram, Viber, and Facebook Messenger; physical TOTP tokens; delivery of one-time codes by e-mail or SMS.
It is almost impossible to hack a standard password and a one-time password simultaneously. Therefore, two-factor authentication is a must-have element in protecting Windows VPN user accounts from unauthorized access and hacking using attacks such as phishing, brute force, keyloggers, social engineering, and the like.
1. Two-Factor Authentication for Windows VPN – How It Works
This guide shows you how to set up two-factor authentication for Windows VPN using Protectimus Cloud-Based Two-Factor Authentication Service or Protectimus On-Premise 2FA Platform and RRAS component. RRAS integration with Protectimus via the RADIUS authentication protocol is required.
The scheme of work of the Protectimus two-factor authentication solution for Windows VPN is shown below.

2. How to Enable Windows VPN 2FA
You can set up Windows VPN two-factor authentication (2FA) with Protectimus using the RADIUS protocol:
- Get registered with Protectimus SAAS Service or install the On-Premise 2FA Platform and configure basic settings.
- Install and configure Protectimus RADIUS Server.
- Install and configure RRAS.
- Configure Windows VPN authentication policies.
2.1. Get Registered and Configure Basic Protectimus Settings
Choose your deployment option and complete the basic setup:
Protectimus Cloud Service
- Register with the Protectimus Cloud Service and activate API.
- Add a Resource.
- Add Users.
- Add Tokens manually or activate the Users’ Self-Service Portal.
- Assign Tokens to Users.
- Assign Users and Tokens to the Resource.
Protectimus On-Premise Platform
- Install the Protectimus On-Premise Platform. If you install the Protectimus Platform on Windows, select the RADIUS option during installation.
- Add a Resource.
- Add Users.
- Add Tokens manually or activate the Users’ Self Service Portal.
- Assign Tokens to Users.
- Assign Tokens with Users to the Resource.
2.2. Install and Configure Protectimus RADIUS Server
Detailed instructions for installing and configuring the Protectimus RADIUS Server for Windows VPN 2-factor authentication using RADIUS are available in our Protectimus RADIUS Server Installation Guide for Windows VPN 2FA.
Specify “inline-mode” in the configuration file. In the “auth” section, add the following settings (you may specify any separator):
inline-mode:
  enabled: true
  separator: ‘,’
2.3. Install and Configure Routing and Remote Access Service (RRAS)
RRAS installation
- Open Server Manager and select “Add Roles and Features Wizard” from the Manage menu.
- In the “Server Roles” section, select “Remote Access”.
- In the “Role Services” section, select “Direct Access and VPN (RAS)”.
- Complete the installation.
RRAS setup
- Start “Routing and Remote Access”.
- Select “Deploy VPN only”.
- Right click on the server name, then select “Configure and Enable Routing and Remote Access”.
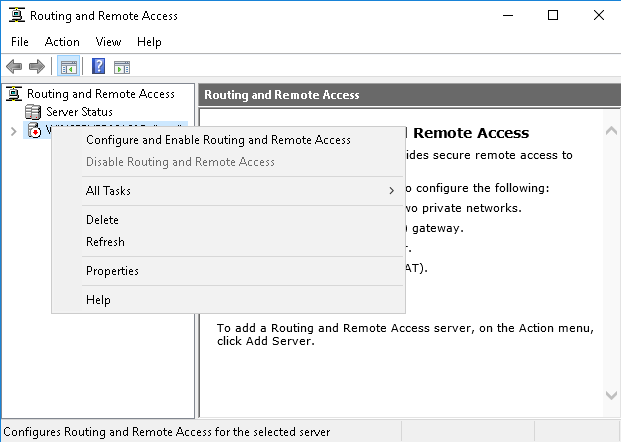
- Select “Custom Configuration”.
- Next, check “VPN Access”.
- Complete the installation and start the service.
Authentication setup
- Go to settings by right-clicking on the server name and selecting “Properties”, then switch to the “Security” tab.
- Select “RADIUS Authentication” from the “Authentication Provider” drop-down list.
- Click on the “Configure” button in the same drop-down list.
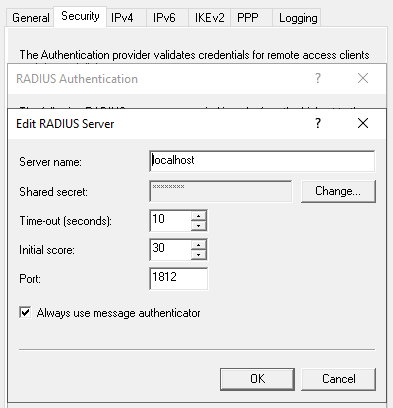
- Next, add a new server:
- Server name: IP address of the PC component where the RADIUS server is installed.
- Shared Secret: the shared secret that was specified in the radius.yml file when configuring RADIUS.
- Also select “Always use message authenticator”.
- Leave the rest of the settings as default.
- Save the added server.
- Next, click on the “Authentication methods” button.
- In the window that appears, leave only “Unencrypted password (PAP)” selected.
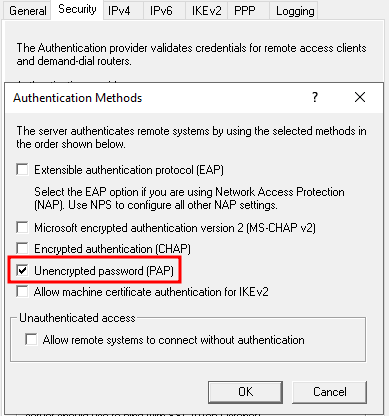
- Save all settings.
2.4. Set up Windows VPN
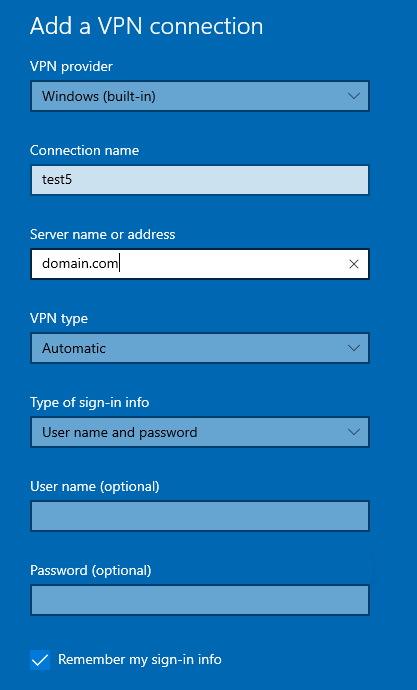
- Go to VPN settings.
- Click “Add a VPN connection”.
- VPN provider: Windows (built-in).
- Server name or address: your server address.
- Type of sign-in info: Username and password.
- Save the VPN connection.
- Next, go to the adapter settings: Control Panel > Network and Internet > Network Connections.
- Right-click on the created VPN connection appapter and click Properties.
- In the “Security” tab, select “Allow the following protocols”.
- Leave only “Unencrypted password (PAP)”.
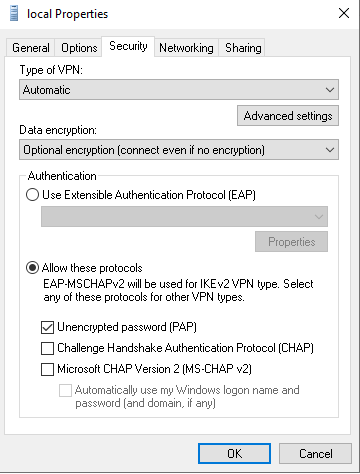
- Save the settings.
- You have completed the Windows VPN 2FA setup, now you can test the connection.
The integration of two-factor authentication into Windows VPN is complete.
If you have questions, please contact Protectimus Support.