Enabling Two-Factor Authentication on Juniper VPN
This Juniper VPN 2FA guide shows how to enable two-factor authentication (2FA / MFA) for Juniper Secure Access SSL VPN using the Protectimus Cloud 2FA Service or On-Premise 2FA Platform.
Protectimus integrates with Juniper Secure Access SSL VPN via RADIUS authentication protocol to add two-factor authentication (2FA) to VPN logins.
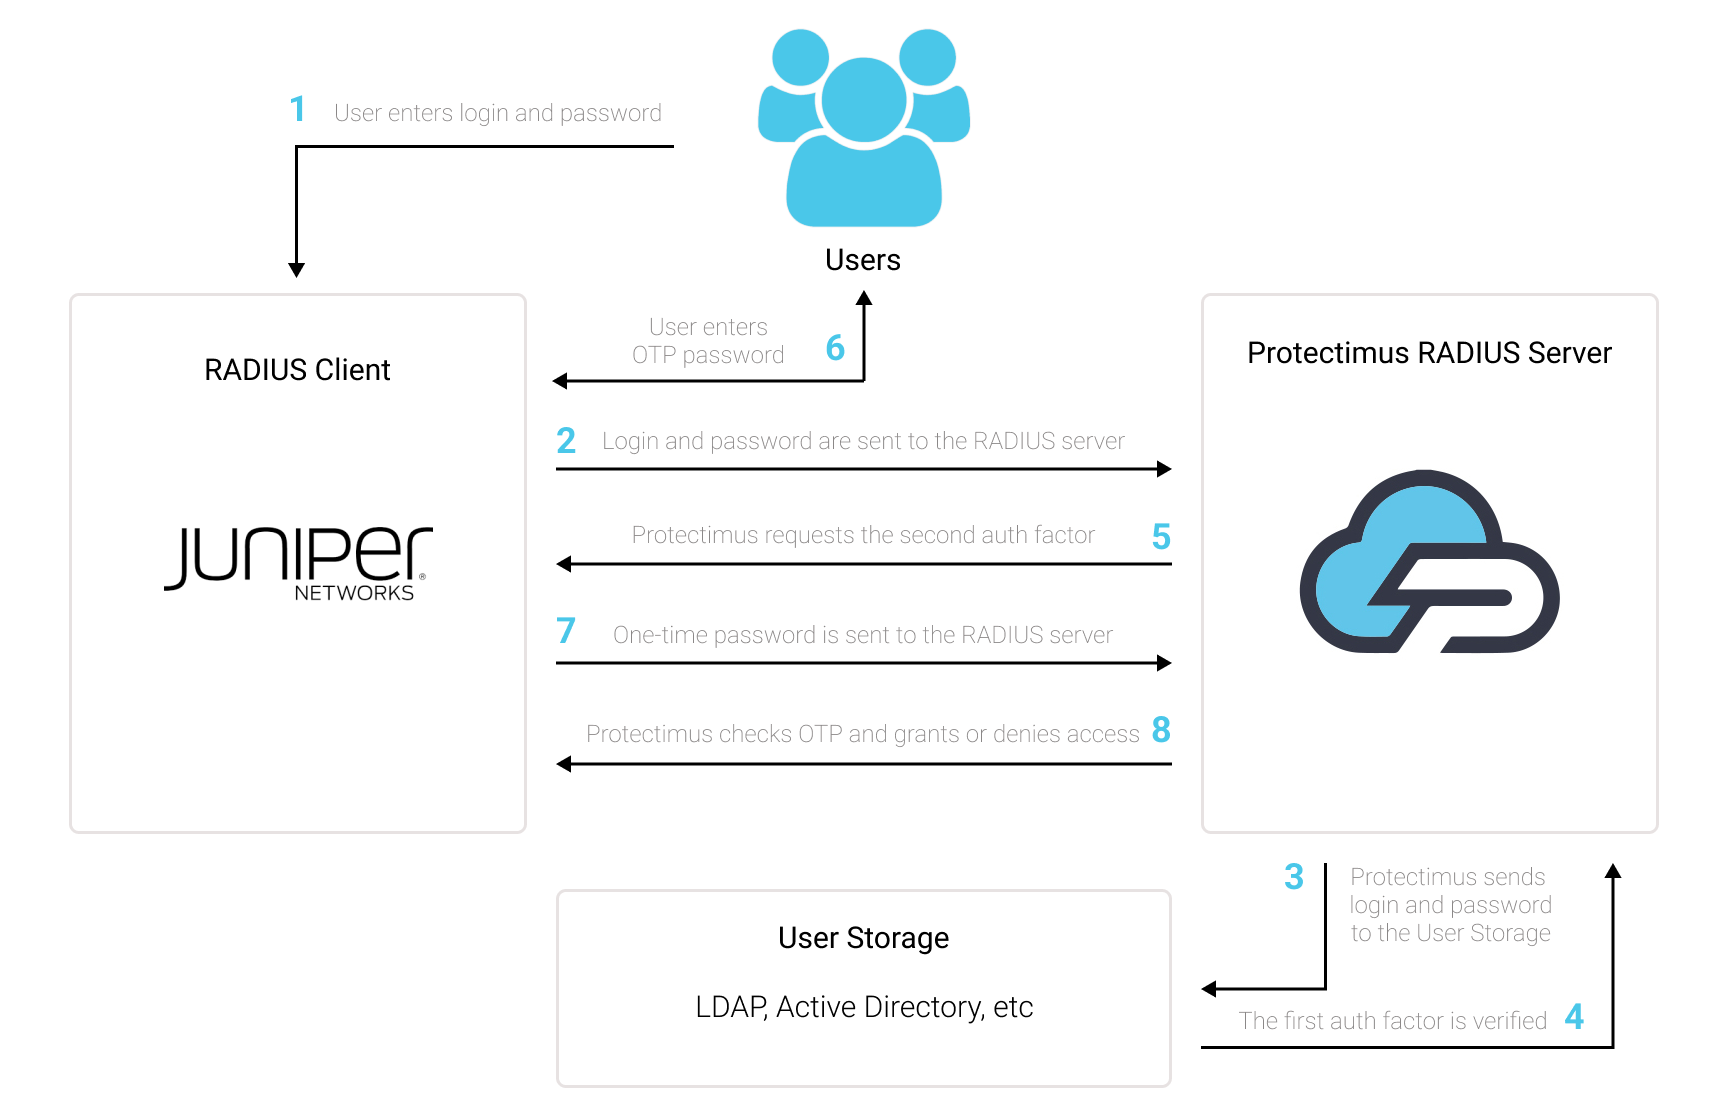
In this scenario, the Protectimus two-factor authentication solution for Juniper VPN 2FA performs as a RADIUS server, and the Juniper Secure Access SSL VPN takes the role of a RADIUS client. You will find the scheme of work of the Protectimus solution for Juniper VPN two-factor authentication below.
1. How Two-Factor Authentication (2FA) Works for Juniper VPN
Two-factor authentication (2FA), also known as multi-factor authentication (MFA), is a must-have security measure for Juniper Secure Access SSL VPN. 2FA will protect Juniper VPN logins from such threats as phishing, brute force, data spoofing, social engineering, keyloggers, man-in-the-middle attacks, etc.
And this is how two-factor authentication for Juniper Secure Access SSL VPN works:
- When a user initiates login to the Juniper VPN protected with two-factor authentication, first of all, they will enter the first authentication factor – their standard password and login (something they know).
- Then they will be asked to enter a second authentication factor – a one-time passcode from the two-factor authentication token (a 2FA token is something the user has – usually, it is a smartphone or a physical OTP token looking like a keyfob).
This way, to get access to the Juniper Secure Access SSL VPN account protected with two-factor authentication, the fraudster has to get access to two authentication factors that differ in their nature. That is quite a challenging task. Moreover, a time-based one-time password remains active only for 30 seconds, which makes hacking way more complecated and almost impossible.
2. How to Enable Juniper VPN 2FA (Two-Factor Authentication)
You can set up Juniper VPN two-factor authentication (2FA) with Protectimus using the RADIUS protocol:
- Get registered with Protectimus SAAS Service or install the On-Premise 2FA Platform and configure basic settings.
- Install and configure Protectimus RADIUS Server.
- Configure Juniper Secure Access SSL VPN authentication policies.
2.1. Get Registered and Configure Basic Protectimus Settings
Choose your deployment option and complete the basic setup:
Protectimus Cloud Service
- Register with the Protectimus Cloud Service and activate API.
- Add a Resource.
- Add Users.
- Add Tokens manually or activate the Users’ Self-Service Portal.
- Assign Tokens to Users.
- Assign Users and Tokens to the Resource.
Protectimus On-Premise Platform
- Install the Protectimus On-Premise Platform. If you install the Protectimus Platform on Windows, select the RADIUS option during installation.
- Add a Resource.
- Add Users.
- Add Tokens manually or activate the Users’ Self Service Portal.
- Assign Tokens to Users.
- Assign Tokens with Users to the Resource.
2.2. Install and Configure Protectimus RADIUS Server
Detailed instructions for installing and configuring the Protectimus RADIUS Server for Juniper Secure Access SSL VPN using RADIUS are available in our Protectimus RADIUS Server Installation Guide for Juniper VPN 2FA.
2.3. Configure Juniper VPN RADIUS Server Profile
- Log in to the Juniper administrative interface.
- In the left menu, navigate to Authentication –> Auth Servers.
- Select Radius Server from the drop down menu then click New Server.
- In the Name field, enter Protectimus RADIUS.
- Under the Primary Server section, enter the following information:
| Radius Server |
IP of server where the Protectimus RADIUS Server component is installed. |
| Secret |
Indicate the shared secret you created in the Protectimus radius.yml file (radius.secret property) when configuring Protectimus RADIUS Server. |
| Authentication Port |
Indicate 1812 (or whichever port you configured in the Protectimus radius.yml file when configuring Protectimus RADIUS Server). |
| Timeout |
Set to 60 seconds. |
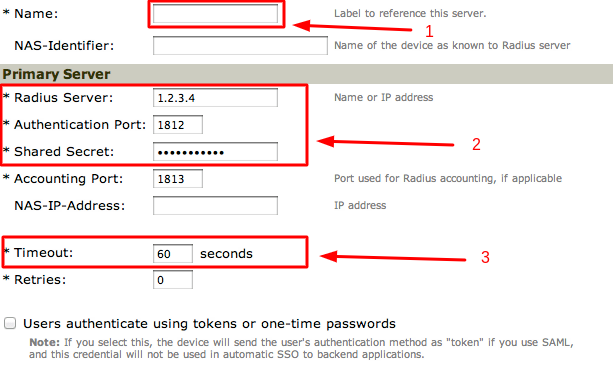
- Click Save Changes to save the RADIUS server profile.
2.4. Add a Custom Radius Rules to Juniper VPN
2.4.1. Create a rule for the Access Challenge packet
- Scroll down to the Custom Radius Rules section.
- Click on New Radius Rule.
- In the Name field, enter Protectimus Radius Rule 1.
- For the Response Packet Type, select Access Challenge.
- Under the Then take action section, select Show Generic Login page.
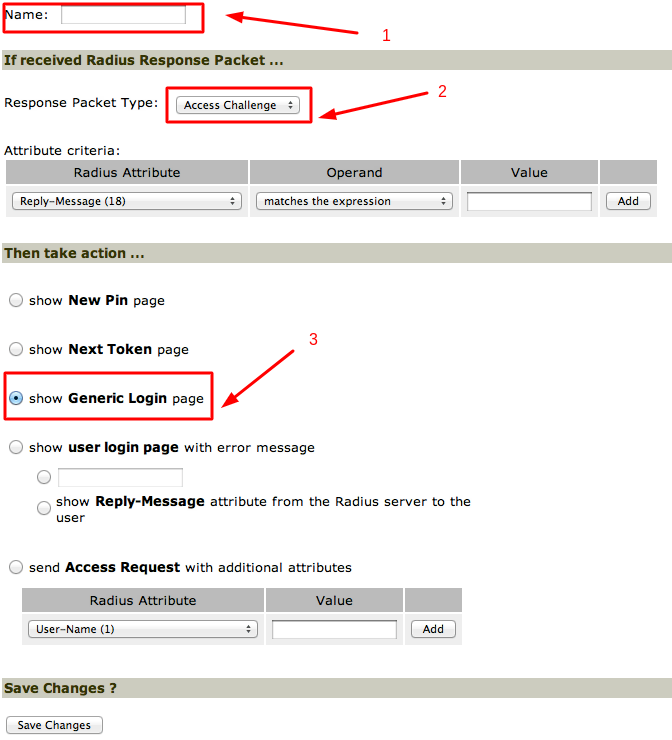
- Click Save Changes.
2.4.2. Create another rule for the Access Reject packet
- Click on New Radius Rule.
- In the Name field, enter Protectimus Radius Rule 2.
- For the Response Packet Type, select Access Reject.
- Under the Then take action section, select Show Generic Login page.
- Click Save Changes.
2.5. Configure a User Realm
To configure a user realm for the Protectimus Radius server, you can do one or more of the following:
- Create a new realm for testing;
- Create a realm to gradually migrate users to the new system (for instance, by duplicating an existing realm);
- Use the default Users realm.
To add 2FA to a user realm:
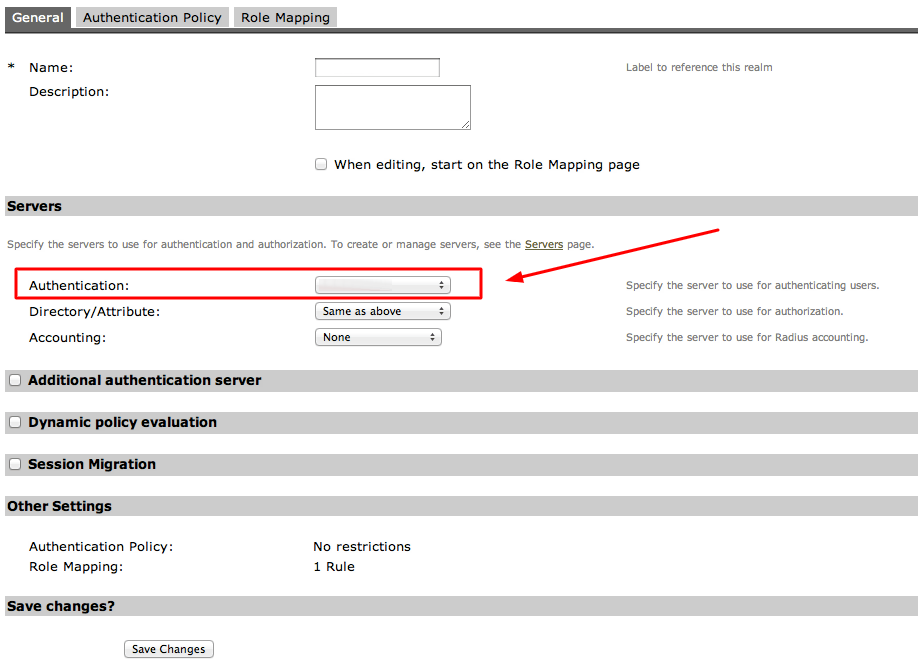
- In the left menu, navigate to Users –> User Realms and click the link for the user realm to which you want to add secondary authentication.
- In the Authentication field, select Protectimus RADIUS and click Save Changes.
- Add the newly created Protectimus RADIUS realm to the authentication realm.
- Click Authentication –> Signing In –> the relevant User URL.
- Move the newly created realm from the Available realms area to the Selected realms area.
- Click Save Changes.
Integration of two-factor authentication (2FA/MFA) for your Juniper Secure Access SSL VPN is now complete.
If you have other questions, contact Protectimus customer support service.