How to Set Up MFA for pfSense OpenVPN
Last updated: October 31, 2026
You can add MFA to pfSense OpenVPN with Protectimus via RADIUS. The Protectimus RADIUS Server is added in pfSense as an authentication server and set as the backend for the OpenVPN server, so after the password users confirm sign-in with a one-time password from a hardware token, an authenticator app, or a messenger chatbot.
Implement
two-factor authentication (2FA) for pfSense OpenVPN through the use of the Protectimus multi-factor authentication system.
Multi-factor authentication (MFA) stands as a crucial component of cybersecurity, safeguarding user accounts, infrastructure, and sensitive data against unauthorized entry. By integrating 2FA into pfSense OpenVPN, potential threats like brute force attacks, keyloggers, data spoofing, phishing, MITM attacks, and social engineering are mitigated.
Protectimus facilitates a secure approach to pfSense OpenVPN access by employing multi-factor authentication (MFA) via the Protectimus RADIUS server.
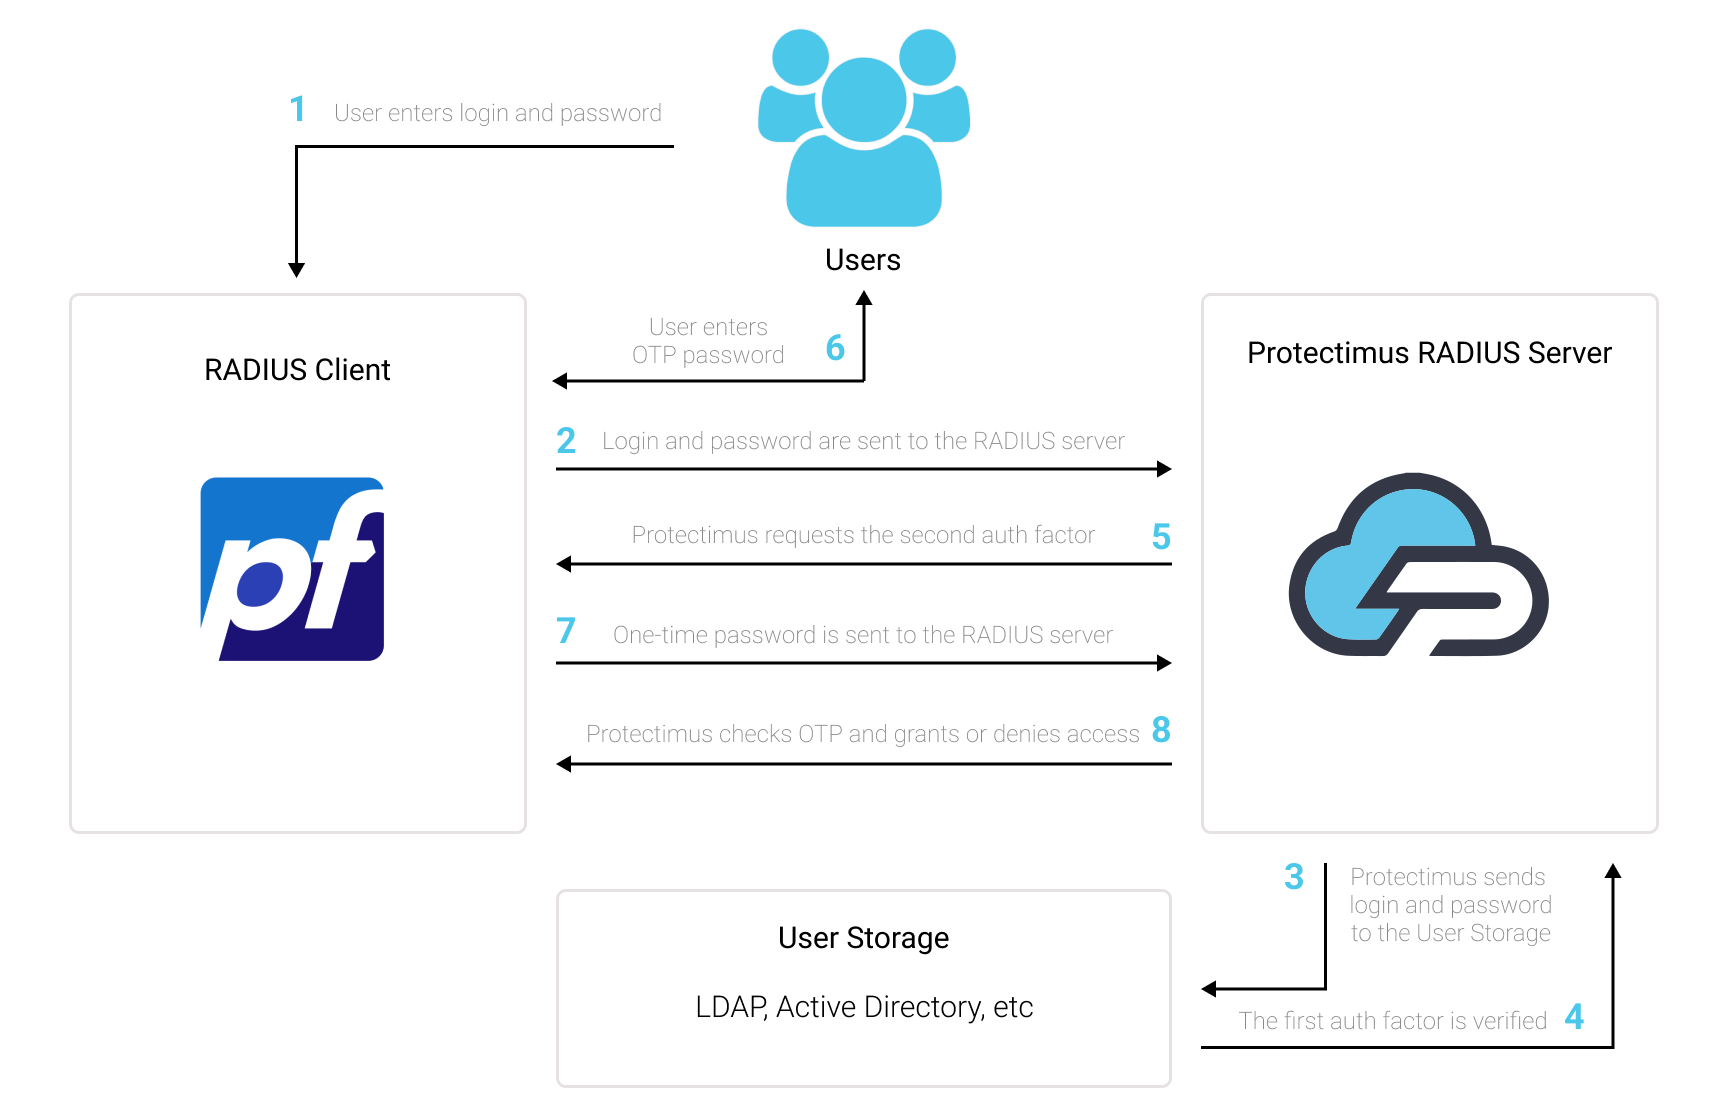
The following scheme outlines the operational process of the Protectimus solution designed for implementing two-factor authentication on pfSense OpenVPN.
Requirements
| Component |
Requirement |
| pfSense |
pfSense with an OpenVPN server in Remote Access (User Auth) mode and RADIUS authentication support |
| pfSense package |
openvpn-client-export |
| Authentication protocol |
PAP |
| Authentication timeout |
60 seconds recommended (the pfSense default is 5) |
| Protectimus |
Protectimus Cloud Service or Protectimus On-Premise Platform |
| RADIUS component |
Protectimus RADIUS Server installed in your network (the built-in FreeRADIUS in pfSense is not used); with the On-Premise Platform for Windows, select the RADIUS option during installation |
| RADIUS port |
1812 by default (set in radius.yml) |
| Users and tokens |
Added to a Protectimus resource manually or through the Users’ Self-Service Portal |
Why Use Protectimus MFA for pfSense OpenVPN
- Works through RADIUS. pfSense adds Protectimus as a standard RADIUS authentication server, so you do not depend on the limited settings of the built-in FreeRADIUS.
- No repeated prompts during a session. The client export settings in this guide turn off hourly renegotiation, so users enter the OTP when they connect rather than every hour.
- Cloud or on-premise. Use the Protectimus Cloud Service or keep authentication data on your own servers with the On-Premise Platform.
- Hardware and software tokens. Hardware OTP tokens, a smartphone app, or OTP delivery by chatbot, added manually or by users themselves in the Self-Service Portal.
- One MFA layer for mixed environments. The same Protectimus resource and tokens can protect other VPN gateways and systems; see MFA for VPN for the wider picture.
How Two-Factor Authentication for pfSense OpenVPN Works
The Two-Factor Authentication Solution by Protectimus enhances the security of pfSense OpenVPN, adding an extra layer of protection that effectively thwarts any unauthorized attempts to access your VPN.
Upon activating pfSense OpenVPN two-factor authentication (2FA), users will be prompted to provide two distinct authentication stages to gain entry to their accounts.
When attempting to access their pfSense OpenVPN accounts protected with 2FA/MFA, users will need to provide:
- Their username and password (something the user knows).
- A unique one-time password generated through a hardware OTP token, 2FA chatbot, or a smartphone app (something the user possesses).
In order to breach a pfSense OpenVPN fortified with two-factor authentication (2FA/MFA), a hacker must obtain both a regular password and a one-time password simultaneously, within a mere 30-second timeframe to intercept the latter. This challenging feat underscores the exceptional effectiveness of two-factor authentication against the majority of hacking endeavors.
How to Enable 2FA for pfSense OpenVPN
You can set up 2-factor authentication (2FA) for pfSense OpenVPN with Protectimus using the RADIUS protocol:
- Get registered with Protectimus SAAS Service or install the On-Premise 2FA Platform and configure basic settings.
- Install and configure Protectimus RADIUS Server.
- Add Protectimus as RADIUS Server for pfSense OpenVPN.
Step 1: Get Registered and Configure Basic Protectimus Settings
Choose your deployment option and complete the basic setup:
Protectimus Cloud Service
- Register with the Protectimus Cloud Service and activate API.
- Add a Resource.
- Add Users.
- Add Tokens manually or activate the Users’ Self-Service Portal.
- Assign Tokens to Users.
- Assign Users and Tokens to the Resource.
Protectimus On-Premise Platform
- Install the Protectimus On-Premise Platform. If you install the Protectimus Platform on Windows, select the RADIUS option during installation.
- Add a Resource.
- Add Users.
- Add Tokens manually or activate the Users’ Self Service Portal.
- Assign Tokens to Users.
- Assign Tokens with Users to the Resource.
Step 2: Install and Configure Protectimus RADIUS Server
Detailed instructions for installing and configuring the Protectimus RADIUS Server for pfSense OpenVPN two-factor authentication using RADIUS are available in our
Protectimus RADIUS Server Installation Guide for OpenVPN pfSense 2FA.
Step 3: Add Protectimus as RADIUS Server for pfSense OpenVPN MFA
First of all, make sure your authentication source is set up accurately, which involves utilizing an external Identity Provider (IdP) such as OpenLDAP, Microsoft Active Directory, FreeIPA, or a standalone FreeRADIUS.
Important Note:
The built-in FreeRADIUS within pfSense has a limited range of settings and does not permit the specification of the user email attribute. Due to this limitation, you cannot employ the internal FreeRADIUS for this integration. Instead, opt for a separate FreeRADIUS installation or select any other Identity Provider mentioned in the preceding section.
It’s imperative to have a correctly configured pfSense system. We assume that you have already added an OpenVPN Server to pfSense via VPN → OpenVPN. Before proceeding with the implementation of multi-factor authentication through Protectimus, you should have a primary authentication solution configured for your OpenVPN users. Refer to the documentation at
pfsense.org if you haven’t installed and configured pfSense yet.
- Launch a web browser and access the pfSense WebGUI.
- Navigate to System –> Package Manager. Switch to the Available Packages tab.
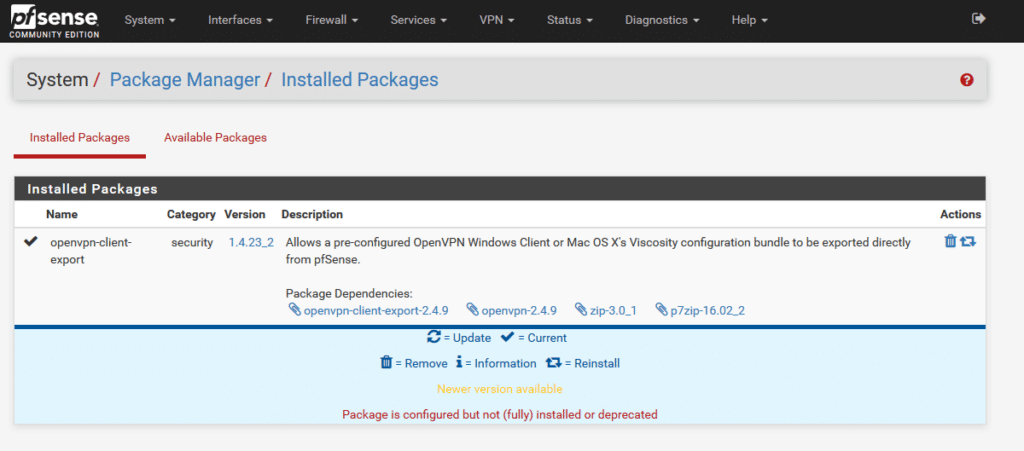
- Find openvpn-client-export and select Install. Confirm your action by clicking the Confirm button. After a brief moment, you’ll receive confirmation of a successful installation. The package should now be visible within the Installed Packages tab.
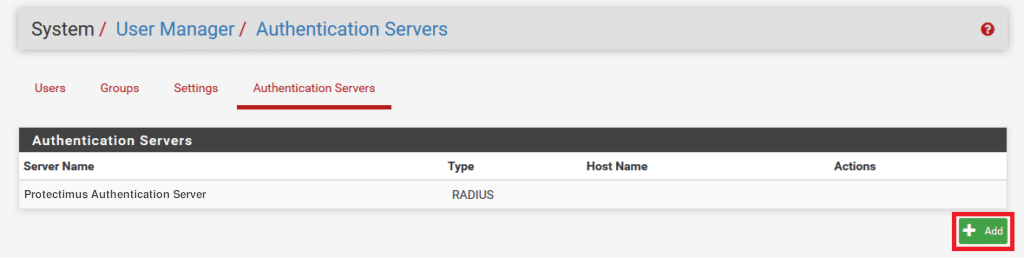
- Access the System –> User Manager section.
- Move to the Authentication Servers tab and proceed to Add.
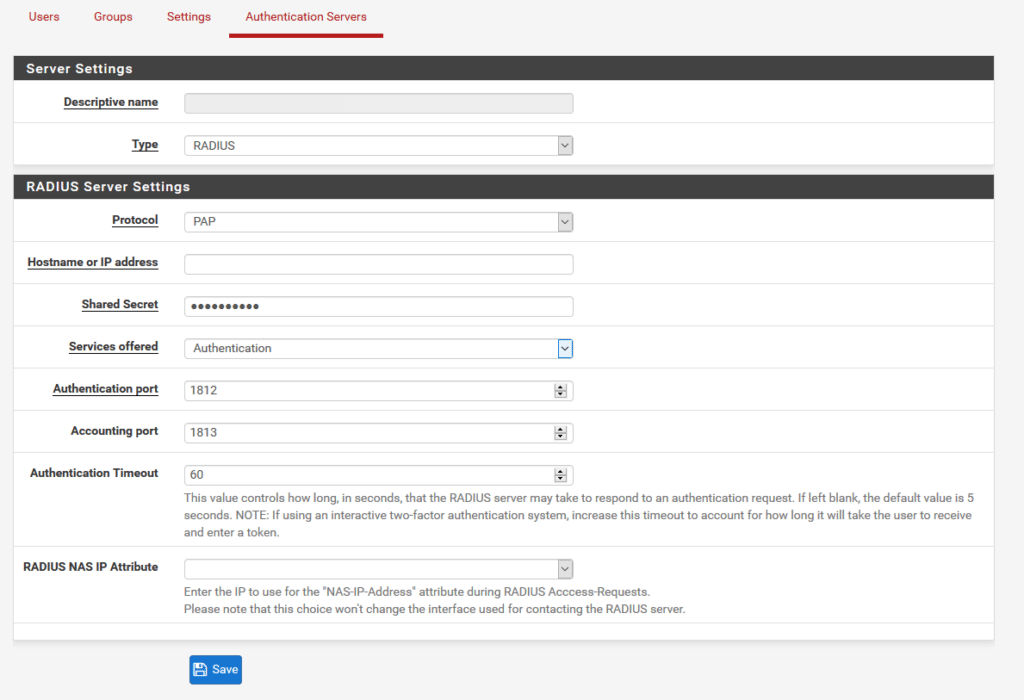
- Complete the form, using the table below for additional guidance on the settings. Once done, click Save to add the Authentication Server.
| Descriptive name |
Add any name you like, e.g., Protectimus RADIUS Server. |
| Type |
Always choose RADIUS. |
| Protocol |
Choose PAP. |
| Hostname or IP address |
IP of server where the Protectimus RADIUS Server component is installed. |
| Shared Secret |
Indicate the shared secret you created in the Protectimus radius.yml file (radius.secret property) when configuring Protectimus RADIUS Server. |
| Services offered |
Must be Authentication. |
| Authentication port |
Indicate 1812 (or whichever port you configured in the Protectimus radius.yml file when configuring Protectimus RADIUS Server). |
| Accounting port |
Retain the preset/default value. |
| Authentication Timeout |
Determines the permissible duration for the RADIUS server to respond to an authentication request.
Default: 5.
Suggested: 60. |
| RADIUS NAS IP Attribute |
Input the IP address to be utilized as the “NAS-IP-Address” attribute when sending RADIUS Access-Requests. |
- Select the Save option.
- Navigate to VPN –> OpenVPN. Locate your interface within the list of OpenVPN Servers. Click on the pencil icon situated on the right side.
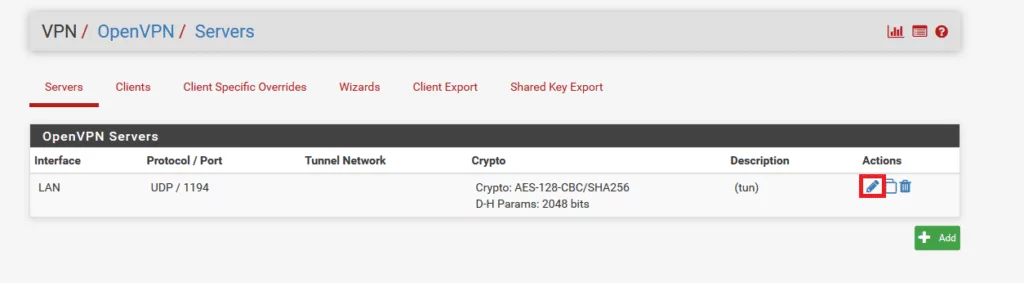
- Transition to the Servers tab. Confirm that the Server mode is configured as Remote Access (User Auth).
- Verify that the Backend for authentication is configured to the Authentication Server generated in Step 6.
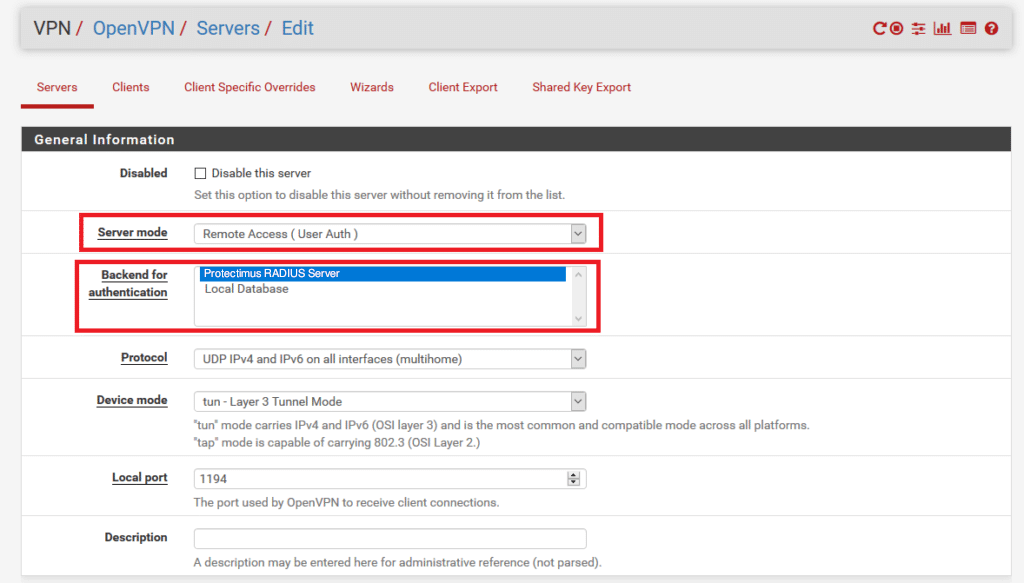
- The remaining settings should be adjusted according to your specific requirements. Click on Save to preserve the modifications.
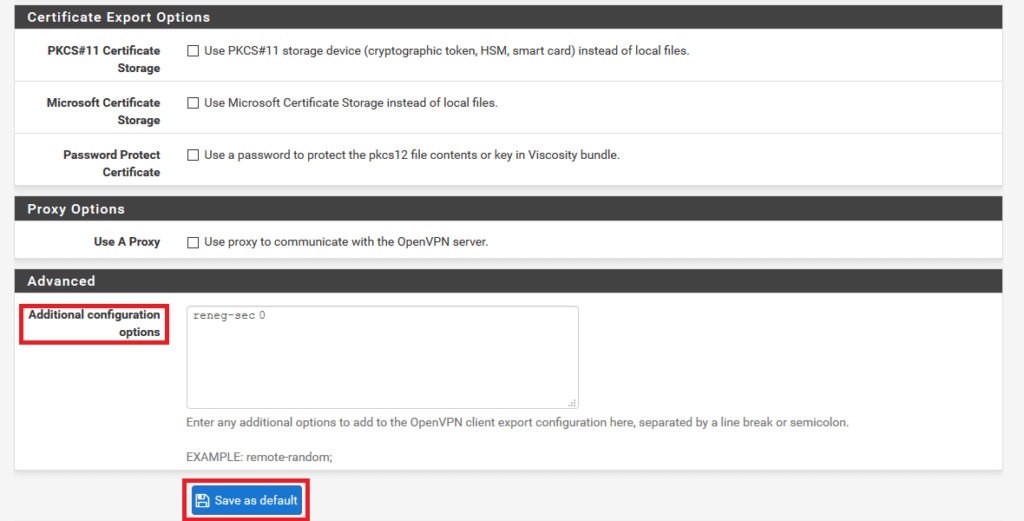
- Transition to the Client Export tab. Proceed to Advanced –> Additional configuration options.
- Integrate the reneg-sec 0 option into Additional configuration options.The reneg-sec n option grants you the ability to modify the duration (in seconds) before a data channel key renegotiation takes place. Adjust it to 0 in order to avoid the need for re-authentication as long as you remain connected without any disconnections.
We highly advise configuring reneg-sec as 0. If an alternate value is chosen, there’s a possibility that your users will encounter 2FA reauthentication prompts once the time defined by that value elapses.
By default, this value stands at 3600 seconds. Therefore, without incorporating the reneg-sec 0 option and leaving the Additional configuration options blank, your users will be prompted to reauthenticate every hour.
- Within the Additional configuration options, include the hand-window 120 option. This choice guarantees the accurate timeout of the authentication process in situations where a user is unable to complete 2FA within the designated timeframe.
- Utilize the Save as default button to preserve this alteration as the default setting.
- Navigate further down to the OpenVPN Clients section, and select the suitable download button in accordance with your requirements. While the Windows Installer is a commonly chosen option, you have the flexibility to opt for any of the provided choices.
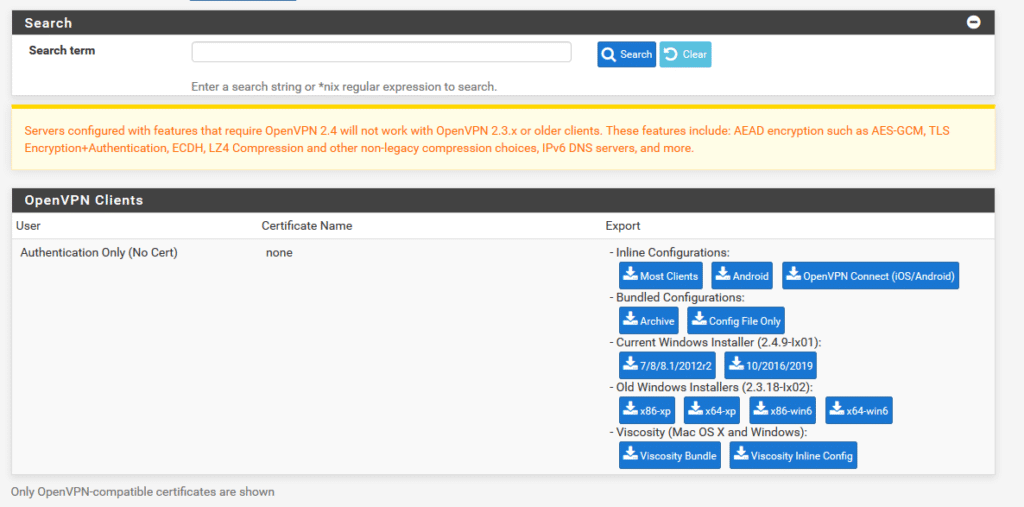
- At this point, you possess a suitable installation file or package tailored for your OpenVPN users. Your configuration process is now finished. Following the installation of the package, your users will experience enabled Protectimus two-factor authentication during their VPN login process.
Integration of two-factor authentication (2FA/MFA) for your pfSense OpenVPN is now complete.
If you have other questions, contact Protectimus
customer support service.
FAQ
Does pfSense support MFA natively, or do I need a third-party solution?
pfSense can use an external RADIUS server as the authentication backend for OpenVPN, and that is how third-party MFA such as Protectimus is added.
Can I use hardware tokens for pfSense OpenVPN login?
Yes. Users can sign in with a code from a hardware OTP token instead of a smartphone app. The token is assigned to the user in Protectimus, and nothing changes on the pfSense side.
Why use the Protectimus RADIUS Server instead of the built-in FreeRADIUS package?
The built-in FreeRADIUS in pfSense has a limited range of settings. The Protectimus RADIUS Server is added under System > User Manager > Authentication Servers as an external RADIUS server, and the OpenVPN server then uses it as its backend for authentication.
Will users be asked for a new OTP during a long VPN session?
Not if the client export is configured as in this guide. By default, OpenVPN renegotiates the connection every hour, and each renegotiation would ask for a new code. Adding reneg-sec 0 to the additional configuration options on the Client Export tab turns this off; hand-window 120 is added in the same place.
What happens if the MFA server is unavailable?
pfSense waits for a response from the Protectimus RADIUS Server for the authentication timeout and then rejects the login. To keep VPN access available, deploy redundant Protectimus RADIUS Server instances; with the On-Premise Platform, the platform itself can run as a multi-node cluster.
Planning MFA for more than one gateway?
Compare MFA options for VPN or
start a free trial of Protectimus.