Gmail is perhaps the most used email service, with which people exchange terabytes of information daily. A typical account contains lots of personal details such as banking data, digital identities, passwords, trade agreements, etc. Unfortunately, despite the service’s popularity, positive reputation and constant effort of its creators, personal data is not protected enough. Besides hidden security mechanisms that work automatically, there is an array of optional measures that must be activated manually. Nevertheless, most of the latter are unknown to or ignored by the majority of users. Often it does not even take a professional hacker to exploit Google Gmail security vulnerabilities using the basic skills in social engineering. In this article, we will talk about how to secure Gmail account by following the 9 simple rules.
1. Set a Strong Password for Your Gmail Account and Change It Regularly
The first thing you need to keep in mind when coming up with a password for your Gmail account is to never use anything personal, such as dates of birth (or any other memorable dates), nicknames, names of animals, etc. In general, everything that a person from your environment may know about you. It is better if it is a random set of letters (in varying case), numbers and special characters.
| Read also: How to Choose and Use Strong Passwords
If you don’t want to bother inventing such a strong password, just use one of many online generators. And the newly created passwords can be stored in a special password manager (for example, such as this).
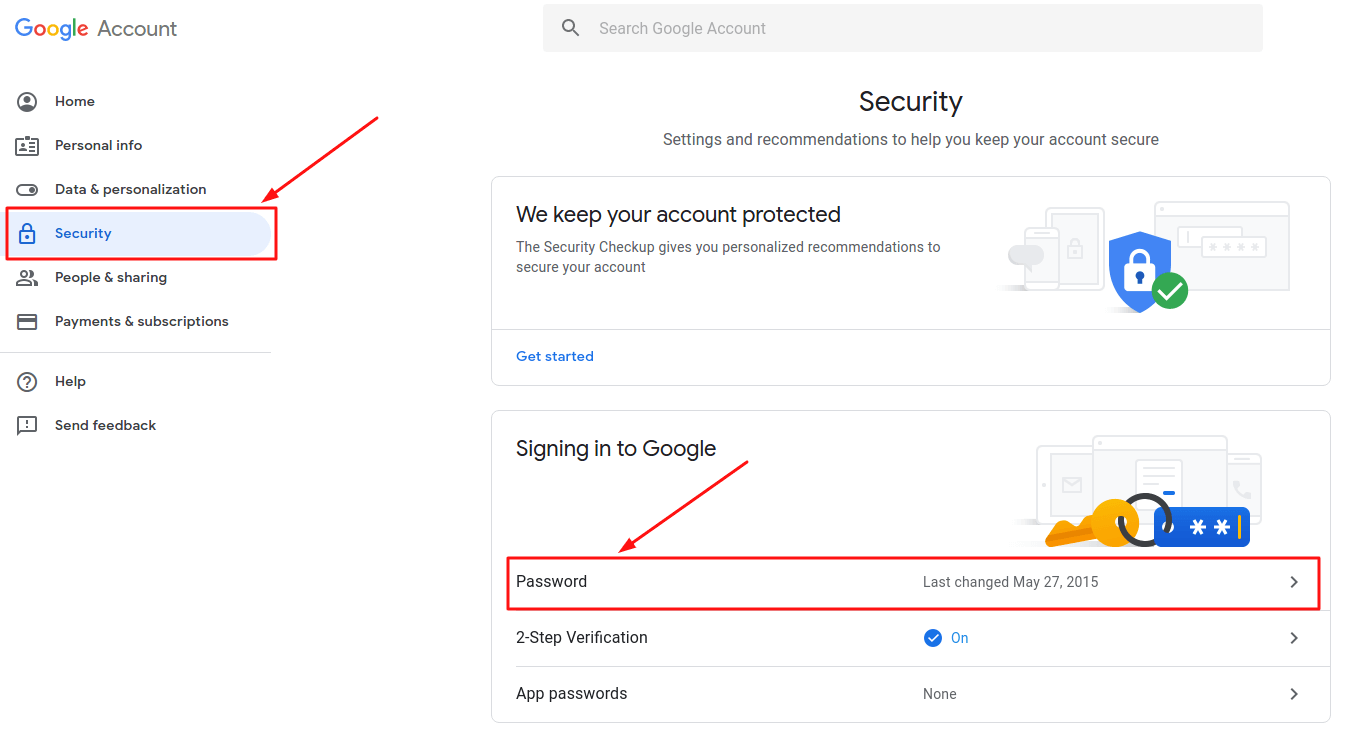
If you want to change your account password right now, follow these steps:
- Sign into your Google account and open the homepage;
- Go to “Security” page and click “Password” in a Signing in to Google” block;
- Set a new password (you will need to enter the current password to confirm your identity first).
2. Turn the Two Factor Authentication On
Gmail two factor authentication is the method, which requires the user not only to carry out the standard authentication procedure (with credentials) but also confirm their identity by entering the one-time code that is generated at their mobile phone by a special app – Google Authenticator or Protectimus Smart OTP.
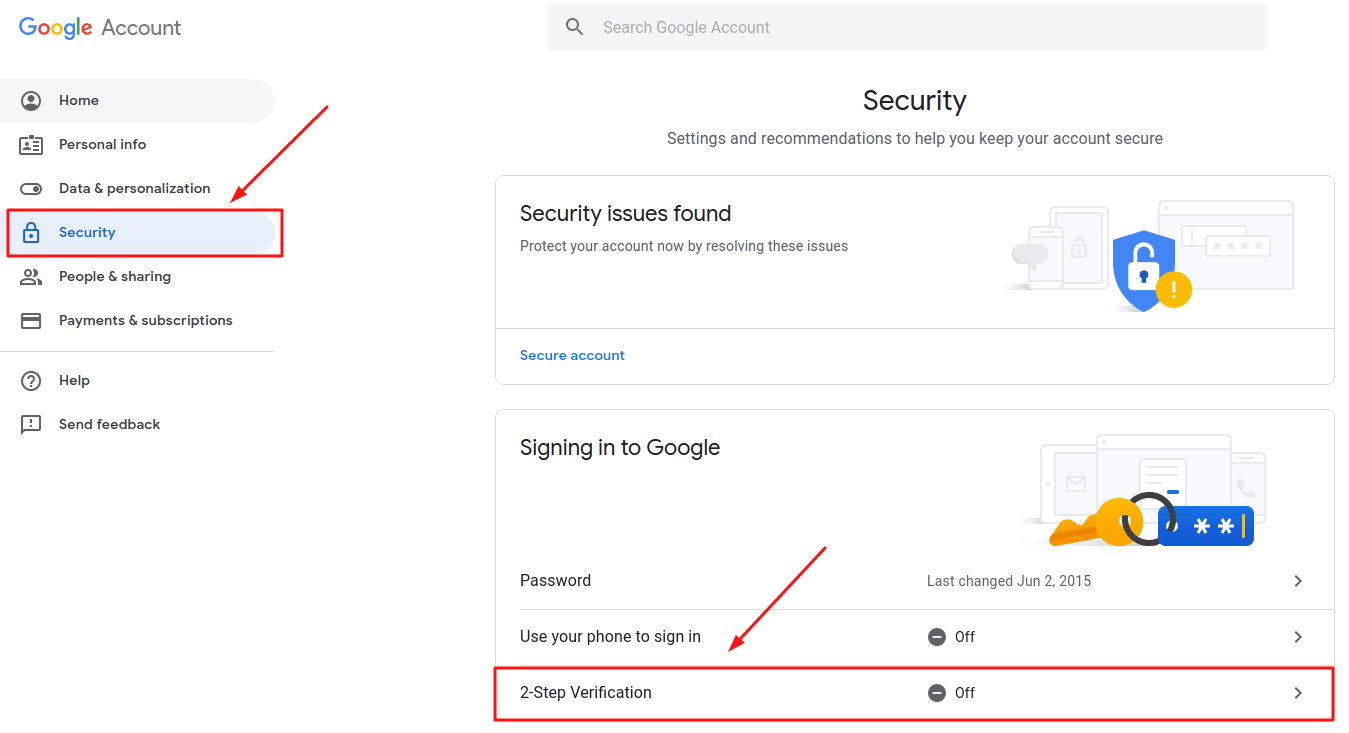
To enable the Gmail 2 factor authentication (2FA), follow these steps:
- Sign into your Google account and open the homepage;
- Go to “Security” page and click “2-Step Verification” in a Signing in to Google” block;
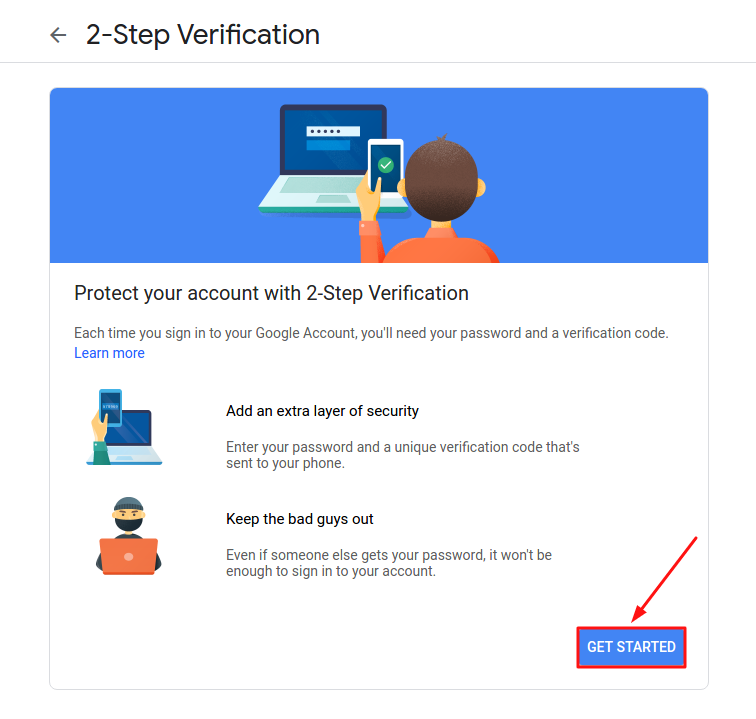
- Click the “GET STARTED” button at the bottom of the page and enter the current password to confirm your identity;
- Choose the desired 2-step verification option:
- SMS or phone call authentication. You can link your phone number to the Google account and use SMS or phone call authentication.
- Google Prompt. With Google Prompt you’ll need only to tap one button on your smartphone to sign in. Keep in mind that only those smartphones that are already connected to the same account can be chosen to receive Google Prompt messages.
- Security key. Security keys are hardware 2-step verification devices that support FIDO standards. Google offers 2 types of security keys – USB Security Key and Bluetooth Security Key. Google sells both devices in one bundle. You’ll need to buy the security key bundle for $50 first.
- Google Authenticator or another 2FA app. Google Authenticator is a two-factor authentication app where you can create software OTP tokens not only for Google account but for any other website supporting two-factor authentication. To set up 2-factor authentication via Google Authenticator app you first have to add the phone number. You can remove the phone later on the 2-Step Verification Setting page.
- Hardware OTP token Protectimus Slim NFC. Contactless hardware OTP tokens Protectimus Slim NFC are the most secure alternative to Gmail authenticator. These tokens are absolutely immune to malware infection as they don’t connect to any network or device. To set up Protectimus Slim NFC you need an Android smartphone with NFC support. A special application Protectimus TOTP Burner allows scanning the QR code with the secret key and flashing the token with this secret. It doesn’t store the secret key and it’s impossible to pull the secret out of the token. After the secret is added to the token it works absolutely autonomously. Learn how to add Protectimus Slim NFC to Google Account here.
- Follow further instructions depending on the method you choose. You’ll find detailed instructions on how to add two-factor authentication to Google account on our blog.
| Read also: The Pros and Cons of Different Two-Factor Authentication Types and Methods
3. Setup the Access Recovery Methods
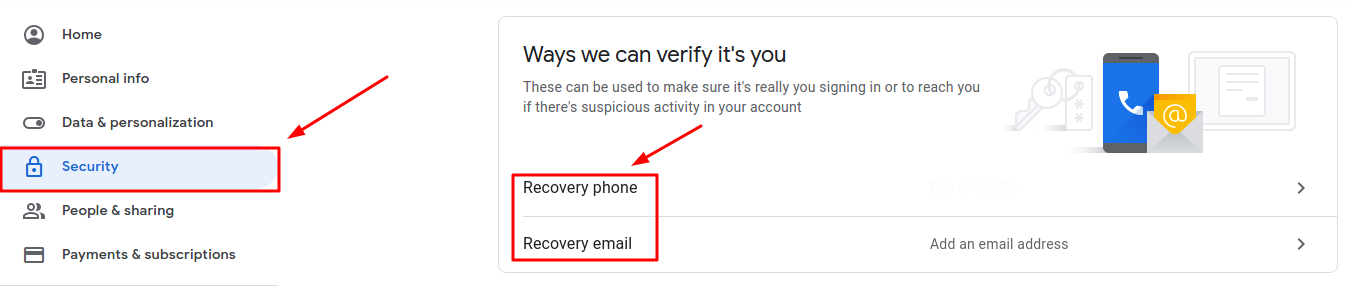
In order to secure email Gmail while at the same time protecting yourself from unnecessary fuss in case of access loss, configure the recovery methods. For this:
- Sign into your Google account and open the homepage;
- Go to “Security” page and find the block “Ways we can verify it’s you”;
- Assign a backup email address and phone number that would be used to restore access (you will need to enter the current password to confirm your identity first in both cases).
We also suggest downloading backup codes for two-factor authentication. This is the list of one-time passwords allowing you to sign in when away from your phone, like when you’re traveling or you lost the token. But remember, backup codes are as secure as a password written down on a paper. Be sure you saved them in a very secure place! To download the backup codes:
- Open the 2-Step Verification page;
- Find the section “Backup codes” and click “SET UP”;
- Download or print the backup codes;
- Save the file or a piece of paper with backup codes in the safest place possible.
| Read also: How to Backup Google Authenticator or Transfer It to a New Phone
4. Conduct the Google Security Checkup
At this point, you need to run a full Google Gmail security checkup from your account’s “Security” tab. It consists of four steps, described below.
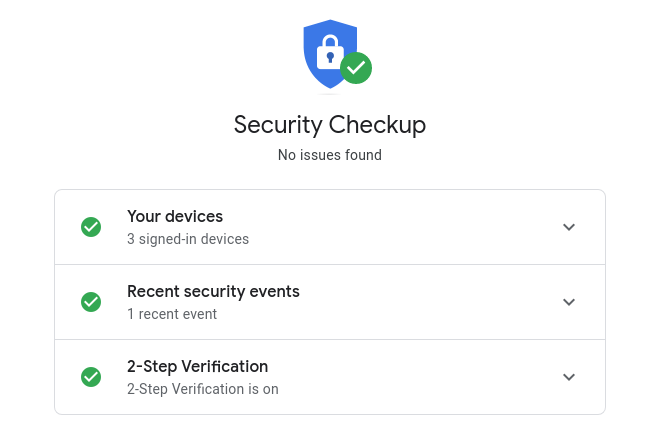
Check Your Connected Devices
You can check your connected devices on Google Security Checkup page. In the context of Google security, connected are those devices that are currently synchronized with your account. In order to make sure that no currently unused or foreign devices are connected, click the “Don’t recognize a device?” link to change the password and prohibit entry from suspicious gadgets.
Check Recent Security Events
On the same Google Security Checkup page, you can also check recent events that happened in your Google account. If you see something strange, it means that someone else could steal your password. Click the “Don’t recognize an event?” and change your password immediately.
Check Your 2-Step Verification Settings
Google Security Checkup page also allows you to review you two-factor authentication methods or add two-factor authentication to your Google account if you haven’t done it yet.
Check Your Account Permissions
When you sign up into third-party web services using the Google account, you automatically provide some information about yourself. Of course, this does not apply to your personal correspondence or personal data, but even those bits of information can theoretically be used against you by fraudsters. In order to prevent any counterfeit activity, we recommend that you carefully study the list of connected apps/services and remove the suspicious ones. Be especially thorough about those services that are allowed access to Gmail sign in and security. Follow this link to check your Google account permissions.
| Read also: Windows Computer Safety Tips
5. Review Your Gmail Security Settings Periodically
In order to make sure that Gmail security works in an intended way, carefully review the Gmail settings pane.
General Tab
This tab includes two potentially harmful options. The first option is “Signature”: make sure that it does not contain the text/HTML-codes you did not input and suspicious links. The second option is “Vacation responder”. Check whether it is turned on or off (depending on your personal preferences) and that its contents carry the correct message.
Accounts and Import Tab
Here, three options should be checked:
- “Send mail as” (ensure that all the entered addresses belong to you);
- “Check mail from other accounts” (also make sure that all the addresses in this list are yours);
- “Grant access to your account” (make sure that no suspicious addresses are on this list: the specified accounts can freely access your mail).
Filters and Blocked Addresses Tab
On this tab, check “The following filters are applied to all incoming mail” option. If you find any suspicious filters, deactivate them immediately.
Forwarding and POP/IMAP Tab
Here you need to check three options:
- “Forwarding” (make sure that your emails are not forwarded to someone else if you have not set this setting personally before);
- “POP download” (if you don’t use email clients, it should be disabled);
- “IMAP access” (similarly, by default this option should not be active).
| Read also: Email hacking protection
6. Report Spam and Phishing letters, Block Suspicious Addresses
If your email address is publicly accessible somewhere (for example, listed on your LinkedIn profile), it may become a target for phishing (that is, you can receive a message with a link that “steals” your authentication data, if you open it; as a rule, phishing messages are disguised as those sent by technical support from well-known services or social networks, such as Facebook). If you have received spam or phishing letter without requesting anything, do not open the link in it. Instead, follow these steps:
- Open a suspicious message in Gmail;
- Click on the icon with the list of options at the top of the message (three vertical dots to the right of the “Reply” button;
- Select one of the options – “Report phishing”/”Report spam” – depending on the message category.
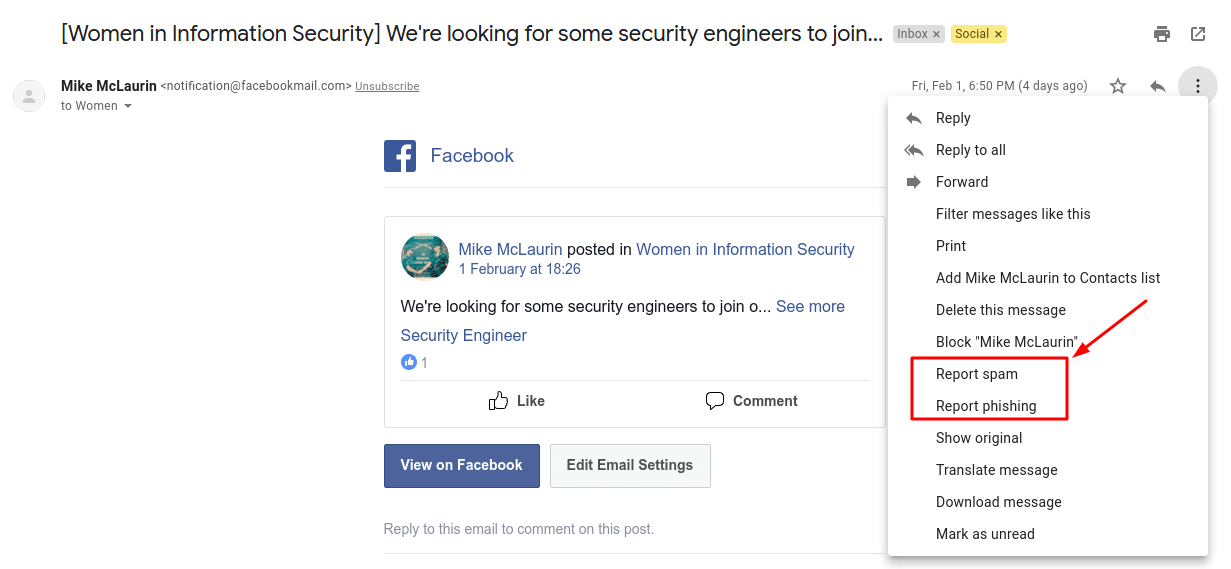
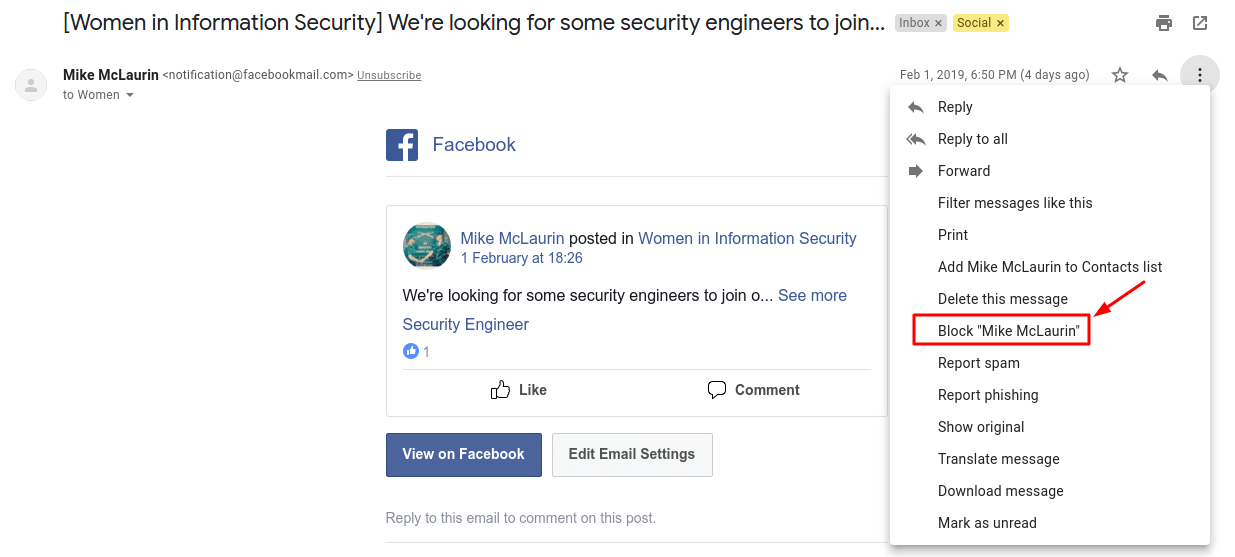
Moreover, network security experts strongly recommend that you ignore (or even better block) any email addresses from which the suspicious emails arrive. As a rule, they are placed into the “Spam” folder but even if this did not happen, carefully check the source from which the letter was received (and never follow any suspicious links).
To block a specific email address, follow these steps:
- Open a suspicious message in Gmail;
- Click on the icon with the list of options at the top of the message (three vertical dots to the right of the “Reply” button;
- Select the “Block” option.
7. Regularly Update Your Browsers and Android Gmail App
Try to keep track of updates to browsers you use to log into your Gmail account, as well as updates to mobile applications. In this case, you will be able to avoid vulnerabilities found in previous versions of software on time.
8. Encrypt Your Emails
You can use special extensions to encrypt your emails and, thus, protect your data from third-party interference. The most popular currently are Streak and OpenPGP.
9. Keep a Separate Email Account for Highly Sensitive Information
To enhance the Gmail account security further, create a separate account for all the sensitive correspondence and never disclose it publicly or to unrelated parties. Thus, even if the scammers know your public mailing address, they will not receive information more than the one you are willing to share.
Conclusion
Let’s summarize our brief “How to secure Gmail account” tutorial. As you can see, it’s not so difficult to protect your own Gmail account, just stick to a small list of rules and regularly check the Gmail security settings:
- Set a Strong Password for Your Gmail Account and Change It Regularly
- Turn the Two Factor Authentication On
- Setup the Access Recovery Methods
- Conduct the Google Security Checkup
- Review Your Gmail Security Settings Periodically
- Report Spam and Phishing letters, Block Suspicious Addresses
- Regularly Update Your Browsers and Android Gmail App
- Encrypt Your Emails
- Keep a Separate Email Account for Highly Sensitive Information
And if you want to provide the highest possible level of Gmail security for your correspondence, order Protectimus Slim NFC tokens today.
Read also:
- How to Protect Facebook Account from Being Hacked
- Reddit was hacked: how it happened, who the victims were, and why SMS authentication failed
- Man In The Middle Attack Prevention And Detection
- Social Engineering: What It Is and Why It Works
- 4 Reasons Two-Factor Authentication Isn’t a Panacea
Subscribe To Our Newsletter
Join our mailing list to receive the latest news and updates from our team.
Subscribe To Our Newsletter
Join our mailing list to receive the latest news and updates from Protectimus blog.
You have successfully subscribed!